CRUD OPERATION IN SYMFONY WITH MYSQL ON WINDOWS 7
1. The Database
The symfony framework supports all PDO-supported databases (MySQL, PostgreSQL, SQLite, Oracle, MSSQL, …).
PDO is the database abstraction layer|Database Abstraction Layer bundled with PHP.
2. The ORM
Databases are relational. PHP 5 and symfony are object-oriented. In order to access the database in an object-oriented way, an interface translating the object logic to the relational logic is required. This interface is called an object-relational mapping, or ORM.
An ORM is made up of objects that give access to data and keep business rules within themselves. One benefit of an object/relational abstraction layer is that it prevents you from using a syntax that is specific to a given database. It automatically translates calls to the model objects to SQL queries optimized for the current database.
Thanks to the database description from the schema.yml file, we can use some Doctrine built-in tasks to generate the SQL statements needed to create the database tables:
First in order to generate the SQL you must build your models from your schema files.
3. Routing
Symfony2 routes the request to the code that handles it by trying to match the requested URL (i.e. the virtual path) against some configured paths. By default, these paths (called routes) are defined in the app/config/routing.yml configuration file.
4. What is a bundle
A bundle is a directory that has a well-defined structure and can host anything from classes to controllers and web resources(PHP files, stylesheets, javascript files, etc). Even if bundles are very flexible, you should follow some best practices if you want to distribute them.
In our application we will create only one bundle that is responsible for everything that has to do with the news pages.
Bundles also act like plugins. This means you can create new bundles yourself that will hold all the code for a specific feature or you can register an external bundle created by someone else. When you create new bundle you don’t need to create all the folders and manually register the bundle with Symfony all this will be done automatically.
5. Bundle Name
A bundle is also a PHP namespace. The namespace must follow the technical interoperability standards for PHP 5.3 namespaces and class names: it starts with a vendor segment, followed by zero or more category segments, and it ends with the namespace short name, which must end with a Bundle suffix.
A namespace becomes a bundle as soon as you add a bundle class to it. The bundle class name must follow these simple rules:
- Use only alphanumeric characters and underscores;
- Use a CamelCased name;
- Use a descriptive and short name (no more than 2 words);
- Prefix the name with the concatenation of the vendor (and optionally the category namespaces);
- Suffix the name with Bundle.
| Namespace | Bundle Class Name |
| Acme\Bundle\BlogBundle | AcmeBlogBundle |
| Acme\Bundle\Social\BlogBundle | AcmeSocialBlogBundle |
| Acme\BlogBundle | AcmeBlogBundle |
6. How to create a bundle
Let's start to creating our bundle in our project called Bookstore which was created in the preview tutorial. Open a command line and enter command for creating bundles.php app/console generate:bundleAfter it will ask the name of your bundle, let's enter the name trying to follow rules for namespaces
Bundle namespace: Perulib/EbookBundleAnd in the bundle class name leave it by default. Then just press enter in all questions.
Bundle name [PerulibEbookBundle]:
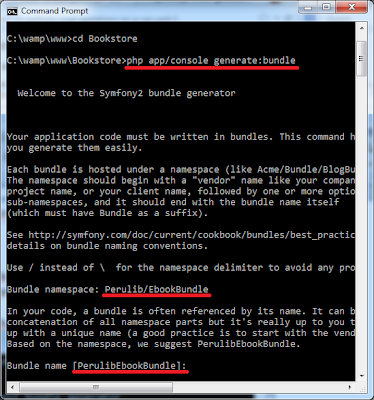
You can see our new bundle was created, just go to C:\wamp\www\Bookstore\src where all bundles are located (Acme bundle is created by default for demo purposes).
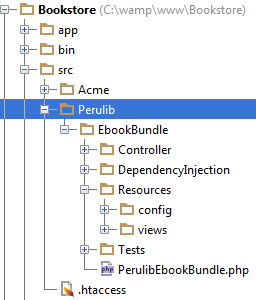
7. Configuration of the Database
You can create your tables using the command line and after can upload to database using doctrine or you can use reverse engineering to bring database tables to generate ORM and entities, for our case we will use the second option. Go to C:\wamp\www\Bookstore\app\config\parameters.yml and modify the name of the database name, user and password.
parameters:
    database_driver: pdo_mysql
    database_host: 127.0.0.1
    database_port: '3306'
    database_name: library
    database_user: root
    database_password: noseas@pepeelvivo
    mailer_transport: smtp
    mailer_host: 127.0.0.1
    mailer_user: null
    mailer_password: null
    locale: en
    secret: b7af9c6f9392bbd3dcacfeb0cc97e2ddec4f30bd
    database_path: null
In my case the database name: libraryTable name: books(id, isbn, title, author, publisher, language)
8. Creating a entity
Once we had configured our database we can create our ORM and Entity files. The first step towards building entity classes from an existing database is to ask Doctrine to introspect the database and generate the corresponding metadata files. Metadata files describe the entity class to generate based on table fields.php app/console doctrine:mapping:import --force PerulibEbookBundle xmlthis command will create our ORM files as you can see in the file location
you can take a look in C:\wamp\www\Bookstore\src\Perulib\EbookBundle\Resources\config\doctrine\Books.orm.xml
<?xml version="1.0" encoding="utf-8"?>
<doctrine-mapping xmlns="http://doctrine-project.org/schemas/orm
/doctrine-mapping" xmlns:xsi="http://www.w3.org/2001/
XMLSchema-instance" xsi:schemaLocation="http://doctrine-project.org/
schemas/orm/doctrine-mapping
http://doctrine-project.org/schemas/orm/doctrine-mapping.xsd">
  <entity name="Perulib\EbookBundle\Entity\Books" table="books">
    <id name="id" type="integer" column="id">
      <generator strategy="IDENTITY"/>
    </id>
    <field name="isbn" type="string" column="isbn" length="255"
    nullable="false"/>
    <field name="title" type="string" column="title" length="255"
    nullable="false"/>
    <field name="author" type="string" column="author" length="255"
    nullable="false"/>
    <field name="publisher" type="string" column="publisher"
    length="255" nullable="false"/>
    <field name="language" type="integer" column="language"
    nullable="false"/>
  </entity>
</doctrine-mapping>
Once the metadata files are generated, you can ask Doctrine to build related entity classes by executing the following two commands.php app/console doctrine:mapping:convert annotation ./src php app/console doctrine:generate:entities PerulibEbookBundleif you go to this location, you will see the complete class for the table books C:\wamp\www\Bookstore\src\Perulib\EbookBundle\Entity\Books.php
<?php
namespace Perulib\EbookBundle\Entity;
use Doctrine\ORM\Mapping as ORM;
/**
 * Books
 *
 * @ORM\Table(name="books")
 * @ORM\Entity
 */
class Books
{
    /**
     * @var string
     *
     * @ORM\Column(name="isbn", type="string", length=255,
       nullable=false)
     */
    private $isbn;
    /**
     * @var string
     *
     * @ORM\Column(name="title", type="string", length=255,
       nullable=false)
     */
     private $title;
/*other private fields and getters and setters*/
9. Generating a CRUD controller Based on a Doctrine Entity
In this section we will generate the CRUD operations, make sure you write exactly the name entity generated in step 8php app/console generate:doctrine:crud --entity=PerulibEbookBundle:Books --format=annotation --with-write --no-interaction

If you go to this folder C:\wamp\www\Bookstore\src\Perulib\EbookBundle\Resources\views, you will find a new folder called Books where is located all the CRUD operation.
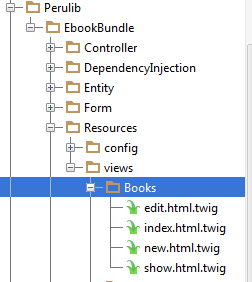
To make it run our project let's add our new bundle to our routing, for this edit the file located at C:\wamp\www\Bookstore\src\Perulib\EbookBundle\Resources\config\routing.yml and add the following lines of code.
PerulibEbookBundle:
    resource: "@PerulibEbookBundle/Controller/"
    type: annotation
    prefix: /
After this modification, you can open your browser and enter http://localhost/bookstore/web/app_dev.php/books/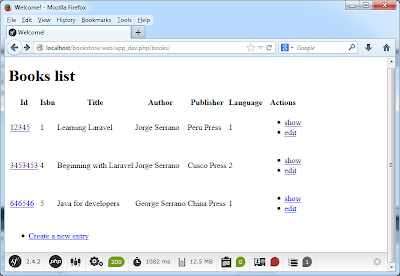
As we can see the presentation is not so good, so next step is give nice presentation adding bootstrap library.
10. Bootstrap with symfony
Let's edit the twig template page, all pages inherit from this base template. Go to C:\wamp\www\Bookstore\app\Resources\views\base.html.twig and add bootstrap css file.
<!DOCTYPE html>
<html>
    <head>
        <meta charset="UTF-8" />
        <link rel="stylesheet" href="//netdna.bootstrapcdn.com/
            bootstrap/3.1.1/css/bootstrap.min.css" rel="stylesheet">
        <title>{% block title %}Welcome!{% endblock %}</title>
        {% block stylesheets %}{% endblock %}
        <link rel="icon" type="image/x-icon"
            href="{{ asset('favicon.ico') }}" />
    </head>
    <body>
    <div class="container">
        {% block body %}{% endblock %}
        {% block javascripts %}{% endblock %}
    </div>
    </body>
</html>
Once have modified in all pages; for example change link option to buttons and that's all. Enjoy it!!!!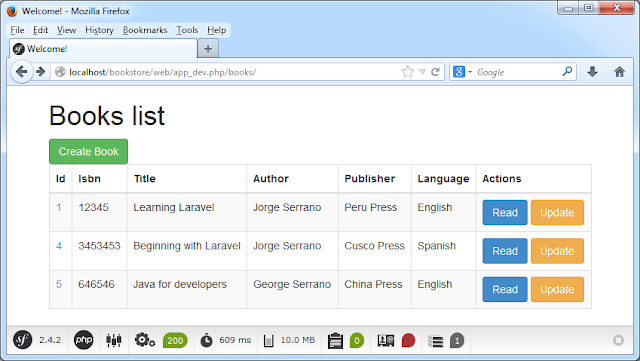
No puedo hacer andar la ultima parte! Me está volviendo loco. Ya intenté de todo.
ReplyDeleteAl agregar el link al CSS de Bootstrap no pasa no veo cambios en la presentación cruda de HTML. ¿Hay algo más que modificar o configurar que no hayas explicado?
Hola Emi, todos los pasos estan bien explicados, no se omitio ningun paso, de seguro debe haber algo que no hicistes bien.
Deletesaludos
great tutorial!!! tks a lot Jorge!
ReplyDeleteI have read your blog its very attractive and impressive. I like it your blog.
ReplyDeletePHP 7 Training in chennai | PHP 7 Training Course
PHP 7 Training in chennai | Online PHP 7 Course
ReplyDeleteIt seems you are so busy in last month. The detail you shared about your work and it is really impressive that's why i am waiting for your post because i get the new ideas over here and you really write so well.
Selenium training in Chennai
Selenium training in Bangalore
Selenium training in Pune
Selenium Online training
Excellent post!!!. The strategy you have posted on this technology helped me to get into the next level and had lot of information in it.
ReplyDeletepython Online training in chennai
python training institute in marathahalli
python training institute in btm
Python training course in Chennai
Thank you for sharing this informative post. Looking forward to reading more.
ReplyDeleteWeb Design and Development Company
thanks for sharing a very informative and useful article.thanks for sharing.Angular training in Chennai
ReplyDelete