George's Blog (Software Development)
Java, C#, Symfony, Laravel, Android, Xcode, Arduino Please Donate: https://streamlabs.com/georgesqhk
Sunday, April 19, 2015
George's Blog (Software Development): CRUD Operations in Laravel 5 with MYSQL, RESTFUL
George's Blog (Software Development): CRUD Operations in Laravel 5 with MYSQL, RESTFUL: CRUD Operations in Laravel 5 with MYSQL, RESTFUL Here we are to see the changes from laravel 4.3 to laravel 5, At the end of this tutoria...
CRUD Operations in Laravel 5 with MYSQL, RESTFUL
CRUD Operations in Laravel 5 with MYSQL, RESTFUL
Here we are to see the changes from laravel 4.3 to laravel 5, At the end of this tutorial, you should be able to create a basic application in Laravel 5 with MYSQL where you could Create, Read, Update and Delete Books; also we will learn how to use images in our application. We will use RESTFUL for this tutorial.1. Create bookstore project
Lets create the project called bookstore; for this in the command line type the following command.composer create-project laravel/laravel bookstore --prefer-dist
2. Testing bookstore project
Go to the project folder and execute the following commandphp artisan serve
Open a web browser and type localhost:8000
 |
| Testing bookstore project |
Until this point our project is working fine. Otherwise learn how to install Laravel in previous posts.
3. Create database for bookstore
Using your favorite DBMS for MYSQL create a database called library and a table called books with the following fields:Please make sure you have exactly these fields in your table, specially update_at and created_at, because Eloquent require them for timestamps.
4. Database setup for bookstore
Here is one of the biggest changes in laravel 5 for security (application and database) Go to bookstore/.env and change the configuration like shown here:.env file
APP_ENV=local
APP_DEBUG=true
APP_KEY=tqI5Gj43QwYFzSRhHc7JLi57xhixnDYH

DB_HOST=localhost
DB_DATABASE=library
DB_USERNAME=root
DB_PASSWORD=your_mysql_password

CACHE_DRIVER=file
SESSION_DRIVER=file
QUEUE_DRIVER=sync

MAIL_DRIVER=smtp
MAIL_HOST=mailtrap.io
MAIL_PORT=2525
MAIL_USERNAME=null
MAIL_PASSWORD=null
5. Create book controller for bookstore
In the command line locate inside your library project type the following command:php artisan make:controller BookController
Just make sure a new class was created in bookstore/app/Http/Controllers
BookController.php file
<?php namespace App\Http\Controllers;

use App\Http\Requests;
use App\Http\Controllers\Controller;
use Illuminate\Http\Request;

class BookController extends Controller {
   /**
    * Display a listing of the resource.
    *
    * @return Response
    */
   public function index()
   {
      //
   }
   /**
    * Show the form for creating a new resource.
    *
    * @return Response
    */
   public function create()
   {
      //
   }
   /**
    * Store a newly created resource in storage.
    *
    * @return Response
    */
   public function store()
   {
      //
   }
   /**
    * Display the specified resource.
    *
    * @param  int  $id
    * @return Response
    */
   public function show($id)
   {
      //
   }

   /**
    * Show the form for editing the specified resource.
    *
    * @param  int  $id
    * @return Response
    */
   public function edit($id)
   {
      //
   }
   /**
    * Update the specified resource in storage.
    *
    * @param  int  $id
    * @return Response
    */
   public function update($id)
   {
      //
   }
   /**
    * Remove the specified resource from storage.
    *
    * @param  int  $id
    * @return Response
    */
   public function destroy($id)
   {
      //
   }
}
6. Create book model
In the command line type the following command:php artisan make:model Book
A new class was created in bookstore/app/
Book.php file
<?php namespace App;
use Illuminate\Database\Eloquent\Model;
class Book extends Model {
   //
}
7. Install Form and Html Facades
In order to use Form and Html facades in laravel 5 as they are being removed from core in 5 and will need to be added as an optional dependency: Type the follow command:composer require illuminate/html
After successful installation we will get the following message
Using version ~5.0 for illuminate/html
./composer.json has been updated
Loading composer repositories with package information
Updating dependencies (including require-dev)
  - Installing illuminate/html (v5.0.0)
    Loading from cache
Writing lock file
Generating autoload files
Generating optimized class loader
Add in providers config/app.php the following line of code
'Illuminate\Html\HtmlServiceProvider',Add in aliases config/app.php the following lines of code
'Form'     => 'Illuminate\Html\FormFacade',
'Html'     => 'Illuminate\Html\HtmlFacade',
8. Restful Controller
In laravel 5, a resource controller defines all the default routes for a given named resource to follow REST principles, where we could find more information about it. So when you define a resource in your bookstore/app/Http/routes.php like:routes.php file
<?php
/*
|--------------------------------------------------------------------------
| Application Routes
|--------------------------------------------------------------------------
|
| Here is where you can register all of the routes for an application.
| It's a breeze. Simply tell Laravel the URIs it should respond to
| and give it the controller to call when that URI is requested.
|
*/
/*
Route::get('/', 'WelcomeController@index');

Route::get('home', 'HomeController@index');

Route::controllers([
   'auth' => 'Auth\AuthController',
   'password' => 'Auth\PasswordController',
]);*/
Route::resource('books','BookController');
As we can see we block the original code to avoid the default authentication laravel created for us. A restful controller follows the standard blueprint for a restful resource, which mainly consists of:
| Domain | Method | URI | Name | Action | Midleware |
|---|---|---|---|---|---|
| GET|HEAD | books | books.index | App\Http\Controllers\BookController@index | ||
| GET|HEAD | books/create | books.create | App\Http\Controllers\BookController@create | ||
| POST | books | books.store | App\Http\Controllers\BookController@store | ||
| GET|HEAD | books/{books} | books.show | App\Http\Controllers\BookController@show | ||
| GET|HEAD | books/{books}/edit | books.edit | App\Http\Controllers\BookController@edit | ||
| PUT | books/{books} | books.update | App\Http\Controllers\BookController@update | ||
| PATCH | books/{books} | App\Http\Controllers\BookController@update | |||
| DELETE | books/{books} | books.destroy | App\Http\Controllers\BookController@destroy |
To get the table from above; type in the command line:
php artisan route:list
9. Insert dummy data
Until this point our project is ready to implement our CRUD operation using Laravel 5 and MySQL, insert some dummy data in the table we created in step 3.In order to display images for books cover we need to create a folder called img inside bookstore/public and download some books cover picture and rename the name according to the field image in our table as shown above with extension jpg.
10. Create layout for bookstore
Go to folder bookstore/resources/view and create a new folder called layout; inside that new folder create a php file called template.blade.php and copy the following code:template.blade.php file
<!doctype html>
<html lang="en">
<head>
<meta charset="UTF-8">
<title>BookStore</title>
<link rel="stylesheet" href="https://maxcdn.bootstrapcdn.com/bootstrap
/3.3.4/css/bootstrap.min.css">
</head>
<body>
    <div class="container">
        @yield('content')
    </div>
</body>
</html>
11. Create view to show book list
Now let's try to fetch books from our database via the Eloquent object. For this let's modify the index method in our app/Http/Controllers/BookController.php. and modify like show bellow.(note that we added use App\Book, because we need to make reference to Book model)
<?php namespace App\Http\Controllers;

use App\Book;
use App\Http\Requests;
use App\Http\Controllers\Controller;
use Illuminate\Http\Request;

class BookController extends Controller {

   /**
    * Display a listing of the resource.
    *
    * @return Response
    */
   public function index()
   {
      //
        $books=Book::all();
        return view('books.index',compact('books'));
    }
To display book list we need to create a view:
Go to folder bookstore/resources/view and create a folder called books; inside this new folder create a new file called index.blade.php and copy the following code index..blade.php file
@extends('layout/template')

@section('content')
 <h1>Peru BookStore</h1>
 <a href="{{url('/books/create')}}" class="btn btn-success">Create Book</a>
 <hr>
 <table class="table table-striped table-bordered table-hover">
     <thead>
     <tr class="bg-info">
         <th>Id</th>
         <th>ISBN</th>
         <th>Title</th>
         <th>Author</th>
         <th>Publisher</th>
         <th>Thumbs</th>
         <th colspan="3">Actions</th>
     </tr>
     </thead>
     <tbody>
     @foreach ($books as $book)
         <tr>
             <td>{{ $book->id }}</td>
             <td>{{ $book->isbn }}</td>
             <td>{{ $book->title }}</td>
             <td>{{ $book->author }}</td>
             <td>{{ $book->publisher }}</td>
             <td><img src="{{asset('img/'.$book->image.'.jpg')}}" height="35" width="30"></td>
             <td><a href="{{url('books',$book->id)}}" class="btn btn-primary">Read</a></td>
             <td><a href="{{route('books.edit',$book->id)}}" class="btn btn-warning">Update</a></td>
             <td>
             {!! Form::open(['method' => 'DELETE', 'route'=>['books.destroy', $book->id]]) !!}
             {!! Form::submit('Delete', ['class' => 'btn btn-danger']) !!}
             {!! Form::close() !!}
             </td>
         </tr>
     @endforeach

     </tbody>

 </table>
@endsection
Let’s see how our book list are displayed; in the command like type
php artisan serve, after open a browser and type localhost:8888/books
12. Read book(Display single book)
Let’s implement Read action, create a new file in bookstore/resources/view/books called show.blade.php and paste the code:show.blade.php file
@extends('layout/template')
@section('content')
    <h1>Book Show</h1>

    <form class="form-horizontal">
        <div class="form-group">
            <label for="image" class="col-sm-2 control-label">Cover</label>
            <div class="col-sm-10">
                <img src="{{asset('img/'.$book->image.'.jpg')}}" height="180" width="150" class="img-rounded">
            </div>
        </div>
        <div class="form-group">
            <label for="isbn" class="col-sm-2 control-label">ISBN</label>
            <div class="col-sm-10">
                <input type="text" class="form-control" id="isbn" placeholder={{$book->isbn}} readonly>
            </div>
        </div>
        <div class="form-group">
            <label for="title" class="col-sm-2 control-label">Title</label>
            <div class="col-sm-10">
                <input type="text" class="form-control" id="title" placeholder={{$book->title}} readonly>
            </div>
        </div>
        <div class="form-group">
            <label for="author" class="col-sm-2 control-label">Author</label>
            <div class="col-sm-10">
                <input type="text" class="form-control" id="author" placeholder={{$book->author}} readonly>
            </div>
        </div>
        <div class="form-group">
            <label for="publisher" class="col-sm-2 control-label">Publisher</label>
            <div class="col-sm-10">
                <input type="text" class="form-control" id="publisher" placeholder={{$book->publisher}} readonly>
            </div>
        </div>

        <div class="form-group">
            <div class="col-sm-offset-2 col-sm-10">
                <a href="{{ url('books')}}" class="btn btn-primary">Back</a>
            </div>
        </div>
    </form>
@stop
Modify app/Http/Controllers/BookController.php
public function show($id)
{
   $book=Book::find($id);
   return view('books.show',compact('book'));
}
Refresh the brower and click in Read action and we will see the book in detail:
13. Create book
Create a new file in bookstore/resources/view/books called create.blade.php and paste the code:create.blade.php file
@extends('layout.template')
@section('content')
    <h1>Create Book</h1>
    {!! Form::open(['url' => 'books']) !!}
    <div class="form-group">
        {!! Form::label('ISBN', 'ISBN:') !!}
        {!! Form::text('isbn',null,['class'=>'form-control']) !!}
    </div>
    <div class="form-group">
        {!! Form::label('Title', 'Title:') !!}
        {!! Form::text('title',null,['class'=>'form-control']) !!}
    </div>
    <div class="form-group">
        {!! Form::label('Author', 'Author:') !!}
        {!! Form::text('author',null,['class'=>'form-control']) !!}
    </div>
    <div class="form-group">
        {!! Form::label('Publisher', 'Publisher:') !!}
        {!! Form::text('publisher',null,['class'=>'form-control']) !!}
    </div>
    <div class="form-group">
        {!! Form::label('Image', 'Image:') !!}
        {!! Form::text('image',null,['class'=>'form-control']) !!}
    </div>
    <div class="form-group">
        {!! Form::submit('Save', ['class' => 'btn btn-primary form-control']) !!}
    </div>
    {!! Form::close() !!}
@stop
Modify app/Http/Controllers/BookController.php
public function create()
{
   return view('books.create');
}

/**
 * Store a newly created resource in storage.
 *
 * @return Response
 */
public function store()
{
   $book=Request::all();
   Book::create($book);
   return redirect('books');
}
Now we need to modify the Book model for mass assignment
<?php namespace App;
use Illuminate\Database\Eloquent\Model;
class Book extends Model {
   //
    protected $fillable=[
        'isbn',
        'title',
        'author',
        'publisher',
        'image'
    ];
}
refresh the Brower and click on create Book
14. Update Book
Create a new file in bookstore/resources/view/books called edit.blade.php and paste the code:edit.blade.php file
@extends('layout.template')
@section('content')
    <h1>Update Book</h1>
    {!! Form::model($book,['method' => 'PATCH','route'=>['books.update',$book->id]]) !!}
    <div class="form-group">
        {!! Form::label('ISBN', 'ISBN:') !!}
        {!! Form::text('isbn',null,['class'=>'form-control']) !!}
    </div>
    <div class="form-group">
        {!! Form::label('Title', 'Title:') !!}
        {!! Form::text('title',null,['class'=>'form-control']) !!}
    </div>
    <div class="form-group">
        {!! Form::label('Author', 'Author:') !!}
        {!! Form::text('author',null,['class'=>'form-control']) !!}
    </div>
    <div class="form-group">
        {!! Form::label('Publisher', 'Publisher:') !!}
        {!! Form::text('publisher',null,['class'=>'form-control']) !!}
    </div>
    <div class="form-group">
        {!! Form::label('Image', 'Image:') !!}
        {!! Form::text('image',null,['class'=>'form-control']) !!}
    </div>
    <div class="form-group">
        {!! Form::submit('Update', ['class' => 'btn btn-primary']) !!}
    </div>
    {!! Form::close() !!}
@stop
Modify app/Http/Controllers/BookController.php
public function edit($id)
{
   $book=Book::find($id);
   return view('books.edit',compact('book'));
}

/**
 * Update the specified resource in storage.
 *
 * @param  int  $id
 * @return Response
 */
public function update($id)
{
   //
   $bookUpdate=Request::all();
   $book=Book::find($id);
   $book->update($bookUpdate);
   return redirect('books');
}
refresh the brower, select the book and click Update button
15. Delete Book
Delete is easy just modify app/Http/Controllers/BookController.php
public function destroy($id)
{
   Book::find($id)->delete();
   return redirect('books');
}
Refresh the Brower and click in delete button for deleting one book and redirect to book list.
Friday, June 27, 2014
George's Blog (Software Development): Temperature and Humidity Sensor DHT11 in Arduino w...
George's Blog (Software Development): Temperature and Humidity Sensor DHT11 in Arduino w...: Temperature and Humidity Sensor DHT11 in Arduino with Java and JfreeChart 1. Problem Statement In this tutorial we will learn how use te...
Temperature and Humidity Sensor DHT11 in Arduino with Java and Jfreechart
Temperature and Humidity Sensor DHT11 in Arduino with Java and JfreeChart
1. Problem Statement
In this tutorial we will learn how use temperature and humidity sensor from the environment using DHT11 in Arduino and process the information in Java via serial Port. We will show the temperature in Celsius degree and Humidity in percentage using JFreeChart open source library.2. JFreeChart
JFreeChart is an open-source framework library for the programming language Java, which allows the creation of a wide variety of both interactive and non-interactive charts. A free Java chart library. JFreeChart supports pie charts (2D and 3D), bar charts (horizontal and vertical, regular and stacked), line charts, scatter plots, time series charts, high-low-open-close charts, candlestick plots, Gantt charts, combined plots, thermometers, dials and more. JFreeChart can be used in applications, applets, servlets, JSP and JSF. You can download from the official web site jfreechart3. Temperature and Humidity Sensor DHT11
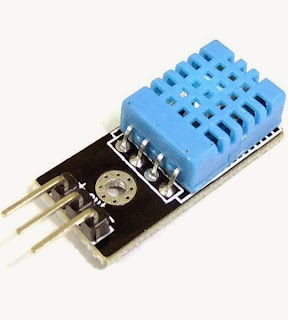
The DHT11 is a basic, ultra low cost digital temperature and humidity sensor. It uses a capacitive humidity sensor and a thermostat to measure the surrounding air, and spits out a digital signal on the data pin. It's fairly simple to use, but requires careful timing to grab data. The only real downside of this sensor is you can only get new data from it once every 2 seconds. In the market you will find many models, some of them have 3 or 4 pins, so be carefully and read the technical specifications.The technical specification of DHT11 are:
- 3 to 5V power and I/O
- 2.5mA max current use during conversion (while requesting data)
- Good for 20-80% humidity readings with 5% accuracy
- Good for 0-50°C temperature readings ±2°C accuracy
- No more than 1 Hz sampling rate (once every second)
- Body size 15.5mm x 12mm x 5.5mm
- 3 pins with 0.1" spacing
4. Sketch for this project
For implement this project we will required the following materials:- DHT11 temperature and humidity sensor
- Wires
- Arduino UNO R3
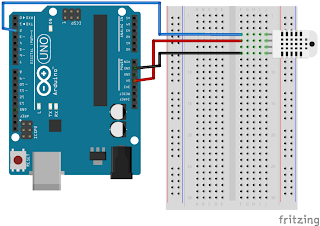
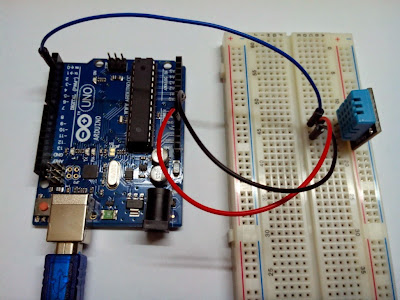
In the next figure we can see the first pin is connected to pin digital 2 in arduino board, the middle one to 5v and the last one is connected to GND.
5. Arduino Source Code to get Temperature and Humidity from DHT11
The source code in arduino is not so complicated, as we can see first you need to add the library dht11.h to start to use DHT11 temperature and humidity sensor and then define the digital pin you will use to read the information from the sensor and finally read the information from dht11 sensor (temperature and humidity) and print in the serial port for further reading from C#.
#include <dht11.h>
//Declare objects
dht11 DHT11;
//Pin Numbers
#define DHT11PIN 2

void setup()
{
  Serial.begin(9600);
}

void loop()
{
  int chk = DHT11.read(DHT11PIN);
  //read temperature in celsius degree and print in the serial port
  Serial.print(DHT11.humidity);
  Serial.print(",");
  //read humidity and print in the serial port
  Serial.print(DHT11.temperature);
  Serial.println();
  delay(2000);
}
6. Designing Project in Java to Show Temperature and Humidity using JFreeChart
First create a java project in Netbeans, in your project go to Libraries folder, right click choose Add JAR/Folder and add the following libraries. Please replace the version numbers with the version you are using.- jcommon-1.0.21.jar
- jfreechart-1.0.17.jar
Java Source Code
In this part we need to create a Class for manage serial Port in Java, for this you can see in this link the java class provide by arduino web site, where also you find the explanation, I modified a little bit that class according to what I want to do, the source code of my class is the following.
import gnu.io.CommPortIdentifier;
import gnu.io.SerialPort;
import java.io.BufferedReader;
import java.io.InputStreamReader;
import java.io.OutputStream;
import java.util.Enumeration;

/**
 *
 * @author george serrano, develop for http://georgehk.blogspot.com
 */
public class SerialPortCommunication {

  //SerialPort
  public SerialPort serialPort;
  //The port we're normally going to use.
  private static final String PORT_NAMES[] = {
      "/dev/tty.usbserial-A9007UX1", // Mac OS X
      "/dev/ttyUSB0", // Linux
      "COM4", // Windows
  };
  //input and output Stream
  private BufferedReader input;
  private OutputStream output;
  //Milliseconds to block while waiting for port open
  public static final int TIME_OUT = 1000;
  //Default bits per second for COM port.
  public static final int DATA_RATE = 9600;
  public void initialize() {
    CommPortIdentifier portId = null;
    Enumeration portEnum = CommPortIdentifier.getPortIdentifiers();
    //First, Find an instance of serial port as set in PORT_NAMES.
    while (portEnum.hasMoreElements()) {
       CommPortIdentifier currPortId = (CommPortIdentifier)
                                         portEnum.nextElement();
       for (String portName : PORT_NAMES) {
         if (currPortId.getName().equals(portName)) {
            portId = currPortId;
            break;
         }
       }
    }
    if (portId == null) {
       System.out.println("Could not find COM port.");
       return;
    }
    try {
       // open serial port, and use class name for the appName.
       serialPort = (SerialPort) portId.open(this.getClass().getName(),
                                                            TIME_OUT);
       // set port parameters
       serialPort.setSerialPortParams(DATA_RATE,
            SerialPort.DATABITS_8,
            SerialPort.STOPBITS_1,
            SerialPort.PARITY_NONE);
       // open the streams for reading and writing in the serial port
       input = new BufferedReader(new
               InputStreamReader(serialPort.getInputStream()));
       output = serialPort.getOutputStream();
    } catch (Exception e) {
      System.err.println(e.toString());
    }
    }
    public void writeData(String data) {
        try {
            //write data in the serial port
            output.write(data.getBytes());
        } catch (Exception e) {
            System.out.println("could not write to port");
        }
    }

    public String getData() {
        String data = null;
        try {
            //read data from the serial port
            data = input.readLine();
        } catch (Exception e) {
            return e.getMessage();
        }
        return data;
    }
}
Also we need to instantiate an object of this class in JFrame's constructor
public frmTemperatureArduinoUNO() {
        initComponents();

        //initialize serial Port
        serialPortCommunication = new SerialPortCommunication();
        serialPortCommunication.initialize();
}
The last steep is implement the source code for Get Temperature Humidity Button
private void jbtnShowTemperatureHumidityActionPerformed
   (java.awt.event.ActionEvent evt) {
   // TODO add your handling code here:
   jtxtHumidity.setText(null);
   jtxtTemperature.setText(null);
   //set temperature in 0
   datasetTemperature.setValue(0);
   //set humidity in 0
   datasetHumidity.setValue(0);
   try {
      int temperature, humidity;
      //get temperature and humidity from serial port
      //sent by arduino and save in temporal string
      String temperatureHumidityArduino =
         serialPortCommunication.getData();
      //split temperature and humidity
      //divided by commas and save in array
      String[] temperatureHumidity =
         temperatureHumidityArduino.split(",");
      //get temperature from array and convert to integer
      temperature = Integer.parseInt(temperatureHumidity[0]);
      //get humidity from array and convert to integer
      humidity = Integer.parseInt(temperatureHumidity[1]);
      //show temperature and humidity in JTextBoxes
      jtxtTemperature.setText(String.valueOf(temperature) + " °C");
      jtxtHumidity.setText(String.valueOf(humidity) + " %");

        //draw temperature
        drawDataSetJfreeChart(temperature, datasetTemperature,
                              jSliderTemperature);
        //draw humidity
        drawDataSetJfreeChart(humidity, datasetHumidity,
                               jSlideHumidity);
     } catch (Exception e) {
        System.out.println(e.getMessage());
     }
}
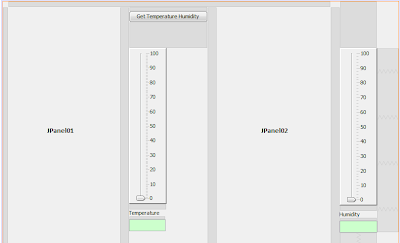
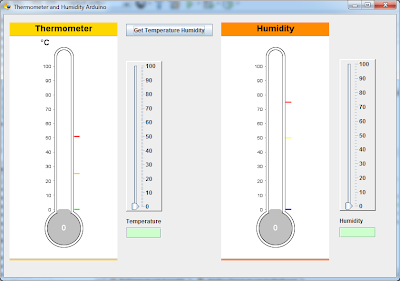
Once you run the project it will show the next window, where we can see two thermometers, one of them for showing the temperature and another to show humidity, also two extra JSliders to probe the right measurement of those thermometers, and finally two JTextBoxes for showing the temperature and humidity in numbers.
7. Running Project
Before run the project make sure the Arduino in writing the temperature and humidity to serial port. Just press F6 to run the project and you will see the program start to looking for serial port open. After press Get Temperature Humidity Button, our program will read temperature and humidity from serial port and draw them in thermometer and humidity chart like depicted in the next figure.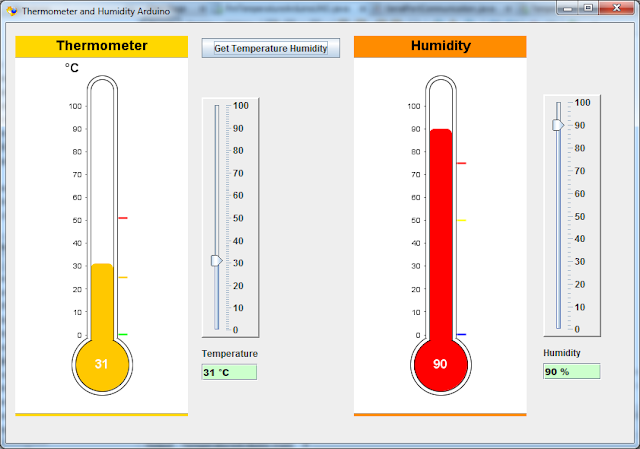
video tutorial in youtube
Friday, May 16, 2014
Temperature and Humidity Sensor DHT11 in Arduino with C#
Temperature and Humidity Sensor DHT11 in Arduino with C#
1. Problem Statement
In this tutorial we will learn how use sensor to get temperature and humidity from the environment using DHT11 Sensor in Arduino and process the information in C# via the serial Port. We will show the temperature in Celsius and Humidity.2. Temperature and Humidity Sensor DHT11
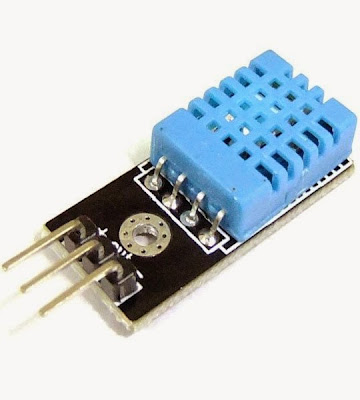
The DHT11 is a basic, ultra low cost digital temperature and humidity sensor. It uses a capacitive humidity sensor and a thermostat to measure the surrounding air, and spits out a digital signal on the data pin. It's fairly simple to use, but requires careful timing to grab data. The only real downside of this sensor is you can only get new data from it once every 2 seconds. In the market you will find many models, some of them have 3 or 4 pins, so be carefully and read the technical specifications. The technical specification of DHT11 are:- 3 to 5V power and I/O
- 2.5mA max current use during conversion (while requesting data)
- Good for 20-80% humidity readings with 5% accuracy
- Good for 0-50°C temperature readings ±2°C accuracy
- No more than 1 Hz sampling rate (once every second)
- Body size 15.5mm x 12mm x 5.5mm
- 3 pins with 0.1" spacing
3. Sketch for this project
For implement this project we will required the following materials:- DHT11 temperature and humidity sensor
- Wires
- Arduino UNO R3
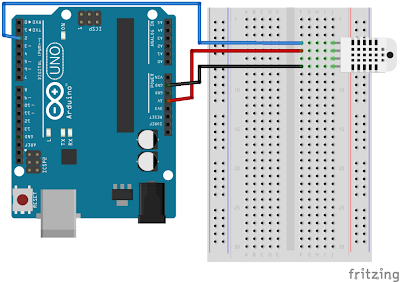
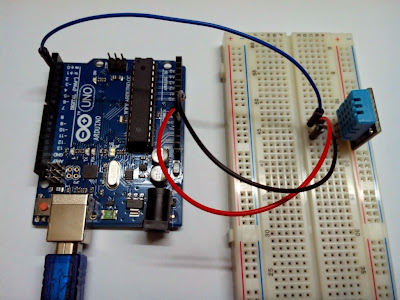
In the next figure we can see the first pin is connected to pin digital 2 in arduino board, the middle one to 5v and the last one is connected to GND.
4. Arduino Source Code to get Temperature and Humidity from DHT11
The source code in arduino is not so complicated, as we can see first you need to add the library dht11.h to start to use DHT11 temperature and humidity sensor and then define the digital pin you will use to read the information from the sensor and finally read the information from dht11 sensor (temperature and humidity) and print in the serial port for further reading from C#.
#include <dht11.h>
//Declare objects
dht11 DHT11;
//Pin Numbers
#define DHT11PIN 2
void setup()
{
  Serial.begin(9600);
}
void loop()
{
  int chk = DHT11.read(DHT11PIN);
  //read temperature in celsius degree and print in the serial port
  Serial.print((float)DHT11.humidity, 2);
  Serial.print(",");
  //read humidity and print in the serial port
  Serial.print((float)DHT11.temperature, 2);
  Serial.println();
  delay(2000);
}
5. Designing Project in C# to Show the Temperature and Humidity
To implement this project using C# we require to draw a gauge control and a needle, in my case I draw them using photoshop for displaying temperature and put the gauge picture in a PictureBox control and for movement of the needle we will make programmatically. Also we need a couple of TextBox to show the temperature, humidity and time. Every 10 seconds we will update the temperature and humidity so we need to use Timer controls and finally we will need a SerialPort control to read the information from the serial port. The design of the interface is shown in the next figure.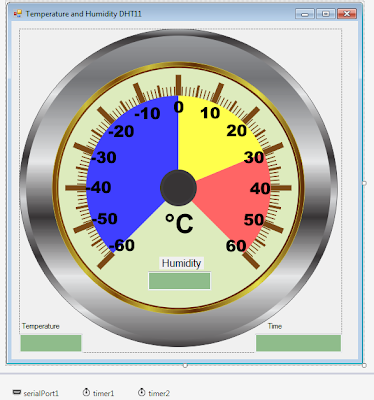
C# Source Code
As we can see this is the main part of the c# source code for this project, we split the information we get from arduino separate by commas into temperature and humidity and then draw that temperature in the gauge control.
private void timer1_Tick(object sender, EventArgs e)
{
    //read temperature and humidity every 10 seconds
    timer1.Interval = 10000;
    //read information from the serial port
    String dataFromArduino = serialPort1.ReadLine().ToString();
    //separete temperature and humidity and save in array
    String[] dataTempHumid = dataFromArduino.Split(',');
    //get temperature and humidity
    int Humidity =
    (int)(Math.Round(Convert.ToDecimal(dataTempHumid[0]),0));
    int Temperature =
    (int)(Math.Round(Convert.ToDecimal(dataTempHumid[1]),0));
    //draw temperature in the graphic
    drawTemperature(Temperature);
    txtHumidity.Text = Humidity.ToString()+" %";
    txtTemperatureCelsius.Text = Temperature.ToString()+" °C";
}
private void timer2_Tick(object sender, EventArgs e)
{
    txtTime.Text = DateTime.Now.ToLongTimeString();
}
private void frmTemperatureHumidity_Load(object sender, EventArgs e)
{
    needle = Image.FromFile("needle2.png");
     serialPort1.Open();
}
6. Running Project
Just press F5 to run the project and you will see the program start to read from the serial port and show in the gauge control, and every 10 seconds it will update with the new information getting from the DHT11 sensor.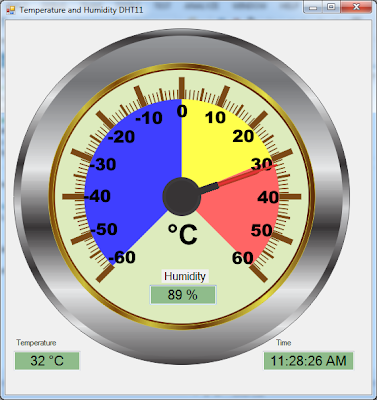
you could see all the implementation in youtube here
Wednesday, May 7, 2014
George's Blog (Software Development): Temperature Sensor LM35 in Arduino with C#
George's Blog (Software Development): Temperature Sensor LM35 in Arduino with C#: Temperature sensor LM35 in Arduino with CSharp 1. Problem Statement In this tutorial we will learn how use temperature sensor LM35 to ge...
Temperature Sensor LM35 in Arduino with C#
Temperature sensor LM35 in Arduino with CSharp
1. Problem Statement
In this tutorial we will learn how use temperature sensor LM35 to get temperature from the environment in Arduino and process the information in C# via the serial Port, Also we will show the temperature in Celsius and Fahrenheit degrees.2. LM35 Precision Centigrade Temperature Sensors
The LM35 is integrated-circuit temperature sensor, whose output voltage is linearly proportional to the Celsius (Centigrade) temperature. The LM35 thus has an advantage over linear temperature sensors calibrated in ° Kelvin, as the user is not required to subtract a large constant voltage from its output to obtain convenient Centigrade scaling. The LM35 does not require any external calibration or trimming to provide typical accuracies of ±1⁄4°C at room temperature and ±3⁄4°C over a full −55 to +150°C temperature range. Low cost is assured by trimming and calibration at the wafer level.. The LM35 is rated to operate over a −55° to +150°C temperature range.Previously we need to understand couple of things, so to connect it to Arduino, you must connect VCC to Arduino 5V, GND to Arduino GND, and the middle pin you must connect to an Analog Pin, in my case we will use A0(Analog pin). This projects doesn't need any resistor or capacitor between the Arduino and the Sensor, but you need to know that Arduino ADC has a precision of 10 bits. This means:
5V / 2^10 = 5V / 1024, so 0.0049 is our factor. To get the temperature in Celsius from LM35, we calculate like this: Temperature Celsius = (pinA0 * 0.0049)*100
3. Sketch for this project
For implement this project we will required the following materials:- LM35 temperature sensor
- Couple of Wires
- Arduino UNO R3
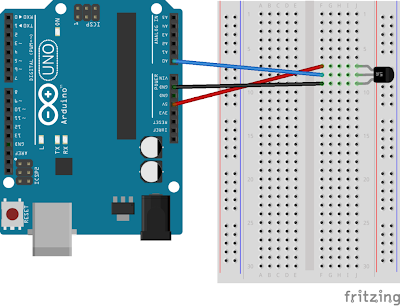
4. Source code to Get Temperature from LM35 in Arduino
Go to Arduino text Area and type de following code, first we define the analog Pin, sensorValue and temperature in Celsius, second we start to open communication for serial, third we get the voltage from LM35 and convert to celsius degree and write in the serial port and get the information from C# and show the temperature.
#define sensorPin 0 //A0 Pin
int sensorValue = 0;
float celsius = 0;
void setup() {
  Serial.begin(9600); //start Serial Port
}
void loop() {
  getTemperature();
  //send celsious value to Port and read from C#
  Serial.println(celsius);
  delay(1000);
}
void getTemperature(){
  //get sensorPin voltage
  sensorValue = analogRead(sensorPin);
  //convert voltage to celsius degree
  celsius = (sensorValue * 0.0049) *100;
}
5. Design Project in C# to show temperature in Celsius and Fahrenheit
Design an interface like depicted in next figure, for design the thermometer I used the Old GDI+, also we will add a TextBox to show the temperature get from serial Port and finally one Button to show the temperature in the thermometer.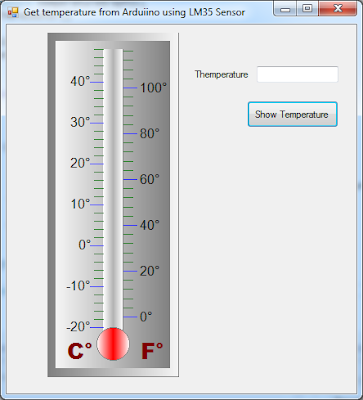
The next code is for button Show temperature, first we verify if the port is open and after get the temperature from serial port which was send by arduino and round this value and send that value to a function which is in charge to draw the current temperature in the thermometer.
private void btnShowTemperature_Click(object sender, EventArgs e)
{
  try
  {
     if (serialPort1.IsOpen)
     {
       //get Temperature from serial port sent by Arduino

       int temperature = (int)(Math.Round(Convert.ToDecimal(
                          serialPort1.ReadLine()), 0));
       txtTemperature.Text = temperature.ToString();
       //draw temperature in the thermometer
       DrawTemperatureLevel(temperature);
     }
   }
   catch (Exception ex)
   {
     MessageBox.Show(ex.Message);
   }
}
6. Running the project
First in arduino UNO R3 press the button Upload and then go to visual studio and run the project, second press the button Show Temperature and then it will show the temperature in the thermometer as shown next figure.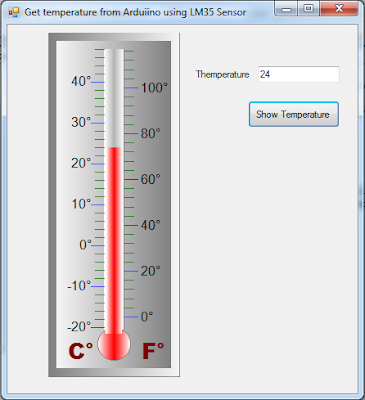
you can watch the video tutorial on youtube.
Subscribe to:
Posts (Atom)


