Wednesday, April 30, 2014

Traffic Light Arduino UNO R3

1. Problem Statement

In this tutorial we are going to create a project to simulate a traffic light using arduino UNO R3 where the system will change from red to green, via amber and repeat this process again and again.

2. What is a LED

A light-emitting diode (LED) is a two-lead semiconductor light source that resembles a basic pn-junction diode, except that an LED also emits light.
An LED is a diode that also emits light. LEDs come in different colors and brightnesses, and can also emit light in the ultraviolet and infrared parts of the spectrum (as in the LEDs in your TV remote control). If you look carefully at an LED, you will notice two things. One is that the legs are of different lengths, and also, that on one side of the LED it is flattened rather than cylindrical (see Figure). These are indicators to show you which leg is the anode (positive) and which is the cathode (negative). The longer leg (anode) gets connected to the positive supply (3.3V) and the leg with the flattened side (cathode) goes to ground.

There is another LED called RGB LED which has a red, green, and blue one package. The LED has four legs: one will be a common anode or cathode, common to all three LEDs and the other three will then go to the anode or cathode of the individual red, green and blue LEDs. You can get any color you want just adjusting the brightness values of the R, G and B channels of the RGB LED.

3. Parts Required for Traffic Light

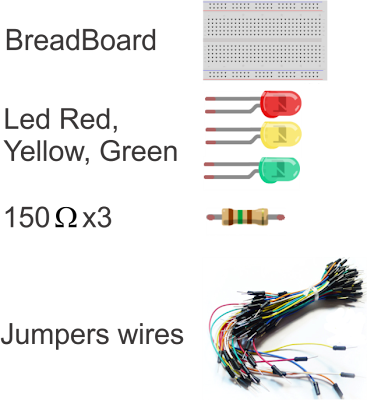
for implement this project we will need the following materials, breadboard, 3 LEDs(Red, Yellow and Green), 150ohm resistors(3) and jumpers wires to connect.

4. Sketch for Traffic Light

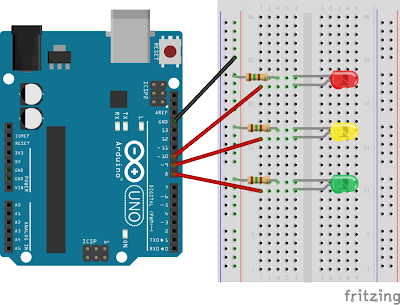
Using Fritzing we draw the following sketch for traffic light project, we just need to make some simple connection as we can see in the next figure.

5. Coding traffic light

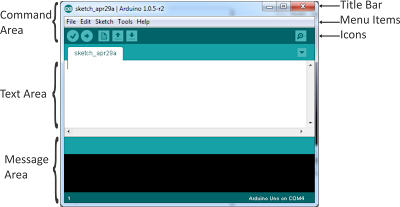
In this section we need to write some code for making run our traffic light project just type the following code in the text area of arduino editor. Make sure your arduino is not connected to computer while you assemble the project to avoid damage to the board.
 
//Traffic light in arduino UNO R3
int ledDelay = 10000; // delay in between changes
int redPin = 10;
int yellowPin = 9;
int bluePin = 8;
void setup() {
  pinMode(redPin, OUTPUT);
  pinMode(yellowPin, OUTPUT);
  pinMode(bluePin, OUTPUT);
}
void loop() {
  digitalWrite(redPin, HIGH); // turn the red light on
  delay(ledDelay); // wait 5 seconds
  
  digitalWrite(yellowPin, HIGH); // turn on yellow
  delay(2000); // wait 2 seconds
  
  digitalWrite(bluePin, HIGH); // turn green on
  digitalWrite(redPin, LOW); // turn red off
  digitalWrite(yellowPin, LOW); // turn yellow off
  delay(ledDelay); // wait ledDelay milliseconds
  
  digitalWrite(yellowPin, HIGH); // turn yellow on
  digitalWrite(bluePin, LOW); // turn green off
  delay(2000); // wait 2 seconds
  digitalWrite(yellowPin, LOW); // turn yellow off
  // now our loop repeats
}
Finally verify if there is not error and connect the arduino USB to your computer and then press in Upload Icon to run.
You can see video demonstration on YouTube.

Tuesday, April 29, 2014

LED Blinking in Arduino UNO

LED Blinking in Arduino UNO R3

1. What is Arduino?

Arduino is an open-source electronics prototyping platform based on flexible, easy-to-use hardware and software. It's intended for artists, designers, hobbyists and anyone interested in creating interactive objects or environments.

2. What Arduino can do

Arduino can sense the environment by receiving input from a variety of sensors and can affect its surroundings by controlling lights, motors, and other actuators. The microcontroller on the board is programmed using the Arduino programming language (based on Wiring) and the Arduino development environment (based on Processing). Arduino projects can be stand-alone or they can communicate with software running on a computer (e.g. Flash, Processing, MaxMSP).

3. Arduino Boards

Browse the wide range of official Arduino boards
Arduino Boards Arduino Boards

4. Getting Starting with Arduino

Get the latest version from the download page.
When the download finishes, unzip the downloaded file. Make sure to preserve the folder structure. Double-click the folder to open it. There should be a few files and sub-folders inside.
Connect the Arduino board to your computer using the USB cable. The green power LED (labelled PWR) should go on.

5. Installing drivers for Arduino Uno

It is important to follow the steps mentioned next to be able to use the Arduino Uno and some other boards. Please check the Arduino website for up-to-date references.
  1. Plug your board in and wait for Windows to begin the driver installation process. 
  2. Click on the Start menu, and open Control Panel. 
  3. In Control Panel, navigate to System and Security. Next, click on System. Once the System window is up, open Device Manager. 
  4. Look under Ports (COM & LPT). Check the open port named Arduino UNO. 
  5. Right-click on the Arduino UNO port and choose the Update Driver Software option. 
  6. Next, choose the Browse my computer for driver software option. 
  7. Finally, navigate and select the Uno's driver file, named ArduinoUNO.inf, located in the Drivers folder of the Arduino software download. 
  8. Windows will finish the driver installation from there and everything will be fine. 
To open arduino UNO, just go to the folder download and double click on arduino and it will display a window depicted in next figure.
Arduino UNO r3

6. Creating Your First Sketch in the IDE

An Arduino sketch is a set of instructions that you create to accomplish a particular task you want to achieve; in other words, a sketch is a program.
For the very first project, we are going to create the LED blink sketch. We will also learn exactly how the hardware and the software for this project works as we go, learning a bit about electronics and coding in the Arduino language (which is a variant of C).
Parts Required:
LED Blinking Arduino
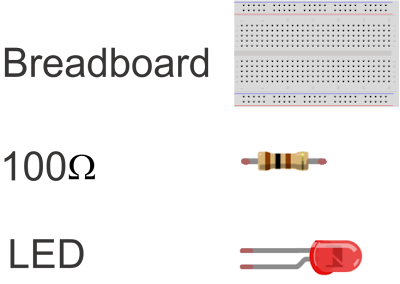
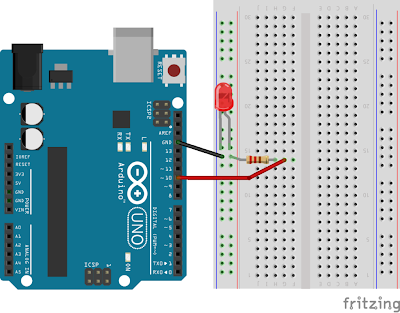
Let's see the sketch for this project, just connect the anode to GND and the Cathode to pin 10 of Arduino's board using 100ohm resistor.
Sketch Arduino led blinking
In the text area type the code:
 
// LED blink Flasher
int ledPin = 10;
void setup() {
   pinMode(ledPin, OUTPUT);
}
void loop() {
   digitalWrite(ledPin, HIGH);
   delay(1000);
   digitalWrite(ledPin, LOW);
   delay(1000);
}

First press verify icon to check if there are some errors, after press upload icon to run your program, if you have done all correctly, you should see the LED blinking every second.

Friday, April 4, 2014

George's Blog (Software Development): CRUD Operation in Symfony with MYSQL

George's Blog (Software Development): CRUD Operation in Symfony with MYSQL: CRUD OPERATION IN SYMFONY WITH MYSQL ON WINDOWS 7 1. The Database The symfony framework supports all PDO-supported databases (MySQL, Po...

CRUD Operation in Symfony with MYSQL

CRUD OPERATION IN SYMFONY WITH MYSQL ON WINDOWS 7

1. The Database

The symfony framework supports all PDO-supported databases (MySQL, PostgreSQL, SQLite, Oracle, MSSQL, …). PDO is the database abstraction layer|Database Abstraction Layer bundled with PHP.

2. The ORM

Databases are relational. PHP 5 and symfony are object-oriented. In order to access the database in an object-oriented way, an interface translating the object logic to the relational logic is required. This interface is called an object-relational mapping, or ORM.
An ORM is made up of objects that give access to data and keep business rules within themselves. One benefit of an object/relational abstraction layer is that it prevents you from using a syntax that is specific to a given database. It automatically translates calls to the model objects to SQL queries optimized for the current database. Thanks to the database description from the schema.yml file, we can use some Doctrine built-in tasks to generate the SQL statements needed to create the database tables:
First in order to generate the SQL you must build your models from your schema files.

3. Routing

Symfony2 routes the request to the code that handles it by trying to match the requested URL (i.e. the virtual path) against some configured paths. By default, these paths (called routes) are defined in the app/config/routing.yml configuration file.

4. What is a bundle

A bundle is a directory that has a well-defined structure and can host anything from classes to controllers and web resources(PHP files, stylesheets, javascript files, etc). Even if bundles are very flexible, you should follow some best practices if you want to distribute them.
In our application we will create only one bundle that is responsible for everything that has to do with the news pages. Bundles also act like plugins. This means you can create new bundles yourself that will hold all the code for a specific feature or you can register an external bundle created by someone else. When you create new bundle you don’t need to create all the folders and manually register the bundle with Symfony all this will be done automatically.

5. Bundle Name

A bundle is also a PHP namespace. The namespace must follow the technical interoperability standards for PHP 5.3 namespaces and class names: it starts with a vendor segment, followed by zero or more category segments, and it ends with the namespace short name, which must end with a Bundle suffix.
A namespace becomes a bundle as soon as you add a bundle class to it. The bundle class name must follow these simple rules:
  • Use only alphanumeric characters and underscores;
  • Use a CamelCased name;
  • Use a descriptive and short name (no more than 2 words);
  • Prefix the name with the concatenation of the vendor (and optionally the category namespaces);
  • Suffix the name with Bundle.
Here are some valid bundle namespaces and class names:
Namespace Bundle Class Name
Acme\Bundle\BlogBundle AcmeBlogBundle
Acme\Bundle\Social\BlogBundle AcmeSocialBlogBundle
Acme\BlogBundle AcmeBlogBundle

6. How to create a bundle

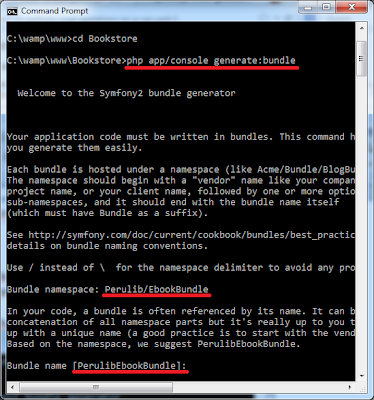
Let's start to creating our bundle in our project called Bookstore which was created in the preview tutorial. Open a command line and enter command for creating bundles.
 
php app/console generate:bundle
After it will ask the name of your bundle, let's enter the name trying to follow rules for namespaces
 
Bundle namespace: Perulib/EbookBundle
And in the bundle class name leave it by default. Then just press enter in all questions.
 
Bundle name [PerulibEbookBundle]:
CRUD Symfony PHP
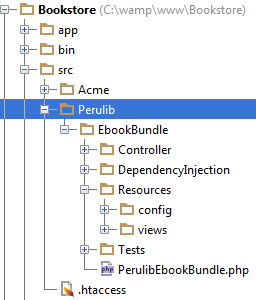
You can see our new bundle was created, just go to C:\wamp\www\Bookstore\src where all bundles are located (Acme bundle is created by default for demo purposes). CRUD Symfony PHP
7. Configuration of the Database

You can create your tables using the command line and after can upload to database using doctrine or you can use reverse engineering to bring database tables to generate ORM and entities, for our case we will use the second option. Go to C:\wamp\www\Bookstore\app\config\parameters.yml and modify the name of the database name, user and password.
 
parameters:
    database_driver: pdo_mysql
    database_host: 127.0.0.1
    database_port: '3306'
    database_name: library
    database_user: root
    database_password: noseas@pepeelvivo
    mailer_transport: smtp
    mailer_host: 127.0.0.1
    mailer_user: null
    mailer_password: null
    locale: en
    secret: b7af9c6f9392bbd3dcacfeb0cc97e2ddec4f30bd
    database_path: null
In my case the database name: library
Table name: books(id, isbn, title, author, publisher, language)

8. Creating a entity

Once we had configured our database we can create our ORM and Entity files. The first step towards building entity classes from an existing database is to ask Doctrine to introspect the database and generate the corresponding metadata files. Metadata files describe the entity class to generate based on table fields.
 
php app/console doctrine:mapping:import --force PerulibEbookBundle xml
this command will create our ORM files as you can see in the file location
you can take a look in C:\wamp\www\Bookstore\src\Perulib\EbookBundle\Resources\config\doctrine\Books.orm.xml
 
<?xml version="1.0" encoding="utf-8"?>
<doctrine-mapping xmlns="http://doctrine-project.org/schemas/orm
/doctrine-mapping" xmlns:xsi="http://www.w3.org/2001/
XMLSchema-instance" xsi:schemaLocation="http://doctrine-project.org/
schemas/orm/doctrine-mapping 
http://doctrine-project.org/schemas/orm/doctrine-mapping.xsd">
  <entity name="Perulib\EbookBundle\Entity\Books" table="books">
    <id name="id" type="integer" column="id">
      <generator strategy="IDENTITY"/>
    </id>
    <field name="isbn" type="string" column="isbn" length="255" 
    nullable="false"/>
    <field name="title" type="string" column="title" length="255" 
    nullable="false"/>
    <field name="author" type="string" column="author" length="255" 
    nullable="false"/>
    <field name="publisher" type="string" column="publisher" 
    length="255" nullable="false"/>
    <field name="language" type="integer" column="language" 
    nullable="false"/>
  </entity>
</doctrine-mapping>
Once the metadata files are generated, you can ask Doctrine to build related entity classes by executing the following two commands.
 
php app/console doctrine:mapping:convert annotation ./src
php app/console doctrine:generate:entities PerulibEbookBundle
if you go to this location, you will see the complete class for the table books C:\wamp\www\Bookstore\src\Perulib\EbookBundle\Entity\Books.php
 
<?php
namespace Perulib\EbookBundle\Entity;
use Doctrine\ORM\Mapping as ORM;
/**
 * Books
 *
 * @ORM\Table(name="books")
 * @ORM\Entity
 */
class Books
{
    /**
     * @var string
     *
     * @ORM\Column(name="isbn", type="string", length=255, 
       nullable=false)
     */
    private $isbn;
    /**
     * @var string
     *
     * @ORM\Column(name="title", type="string", length=255,
       nullable=false)
     */
     private $title;
/*other private fields and getters and setters*/

9. Generating a CRUD controller Based on a Doctrine Entity

In this section we will generate the CRUD operations, make sure you write exactly the name entity generated in step 8
 
php app/console generate:doctrine:crud --entity=PerulibEbookBundle:Books
 --format=annotation --with-write --no-interaction

CRUD Symfony PHP
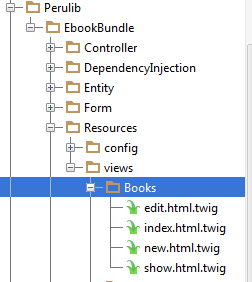
If you go to this folder C:\wamp\www\Bookstore\src\Perulib\EbookBundle\Resources\views, you will find a new folder called Books where is located all the CRUD operation.
CRUD Symfony PHP
To make it run our project let's add our new bundle to our routing, for this edit the file located at C:\wamp\www\Bookstore\src\Perulib\EbookBundle\Resources\config\routing.yml and add the following lines of code.
 
PerulibEbookBundle:
    resource: "@PerulibEbookBundle/Controller/"
    type: annotation
    prefix: /
After this modification, you can open your browser and enter http://localhost/bookstore/web/app_dev.php/books/
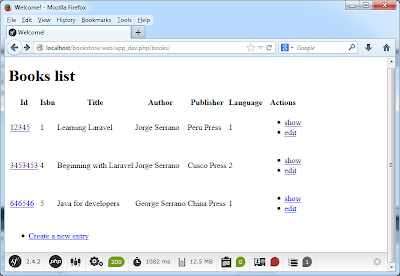
CRUD Symfony PHP
As we can see the presentation is not so good, so next step is give nice presentation adding bootstrap library.

10. Bootstrap with symfony

Let's edit the twig template page, all pages inherit from this base template. Go to C:\wamp\www\Bookstore\app\Resources\views\base.html.twig and add bootstrap css file.
 
<!DOCTYPE html>
<html>
    <head>
        <meta charset="UTF-8" />
        <link rel="stylesheet" href="//netdna.bootstrapcdn.com/
            bootstrap/3.1.1/css/bootstrap.min.css" rel="stylesheet">
        <title>{% block title %}Welcome!{% endblock %}</title>
        {% block stylesheets %}{% endblock %}
        <link rel="icon" type="image/x-icon" 
            href="{{ asset('favicon.ico') }}" />
    </head>
    <body>
    <div class="container">
        {% block body %}{% endblock %}
        {% block javascripts %}{% endblock %}
    </div>
    </body>
</html>
Once have modified in all pages; for example change link option to buttons and that's all. Enjoy it!!!!
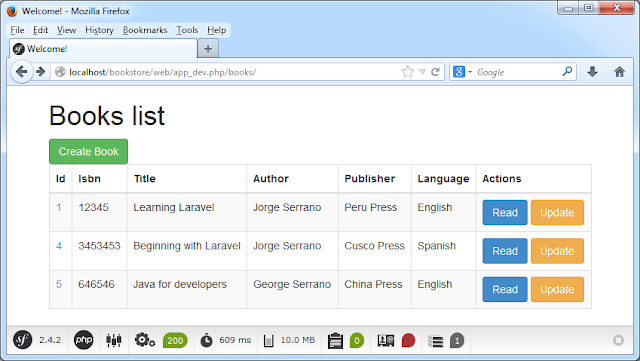
CRUD Symfony PHP

Thursday, April 3, 2014

George's Blog (Software Development): Installation and Configuration os Symfony2 on Wind...

George's Blog (Software Development): Installation and Configuration os Symfony2 on Wind...: INSTALLATION AND CONFIGURATION OF SYMFONY2 ON WINDOWS 7 1. What is Symfony? Symfony is an open source PHP web development framework desi...

Installation and Configuration os Symfony2 on Windows 7

INSTALLATION AND CONFIGURATION OF SYMFONY2 ON WINDOWS 7

1. What is Symfony?

Symfony is an open source PHP web development framework designed to optimize the development of web applications by way of several key features. For starters, it separates a web application’s business rules, server logic, and presentation views. It contains numerous tools and classes aimed at shortening the development time of a complex web application, but also for smaller functionalities needed for your project. Additionally, it automates common tasks so that the developer can focus entirely on the specifics of an application. The end result of these advantages means there is no need to reinvent the wheel every time a new web application is built.
Symfony was written entirely in PHP 5. It has been thoroughly tested in various real-world projects, and is actually in use for high-demand e-business websites. It is compatible with most of the available databases engines, including MySQL, SQLite, PostgreSQL, Oracle, and Microsoft SQL Server. It runs on linux and Windows platforms.

2. Installation of Symfony

Before install Symfony, you should have the following requirements: WampServer Take a look about the WampServer and composer instalation in my preview tutorial.

3. Installing Composer

Composer is the package manager used by modern PHP applications and the only recommended way to install Symfony2. To install Composer on a Windows system, download from the official web site executable installer.

4. Create a symfony Project

Create a symfony project is not so complicated, but we need to know how do it for example using the command line.
In this tutorial we will create a symfony project called Bookstore and in next tutorial we will implement simple CRUD operation using the same project.
Open a command line and execute the following command to install the latest version of Symfony2 in the "C:/wamp/www" directory:
 
composer create-project symfony/framework-standard-edition
Bookstore/ ~2.4

This will take time depend of your internet connection, because need to download all the files from the server of symfony and after it will ask you if you want to set up your database, let it by default and you can configure it later.
Installation of Symfony
Go to \Bookstore\src\Acme\DemoBundle\Resources\views\Demo\hello.html.twig And add a line of code where say "Welcome to Symfony2 Development"
 
{% extends "AcmeDemoBundle::layout.html.twig" %}

{% block title "Hello " ~ name %}

{% block content %}

    <h1>Welcome to Symfony2 Development</h1>

    <h1>Hello {{ name }}!</h1>

{% endblock %}

{% set code = code(_self) %}

5. Run the Project

Before run Symfony2 for the first time, execute the following command to make sure that your system meets all the technical requirements:
 
cd Bookstore/
php app/check.php
Try to fix the error appear and then use the PHP built-in web server to run Symfony:
Run the project
  1. This is one way to run the symfony application using the command line
     
    php app/console server:run
    
    
    Open a browser and access the http://localhost:8000/demo/hello/george
  2. Or you can open with the complete path in case you don’t want to run the server(you must know that your wampserver should be running)
    http://localhost/bookstore/web/app_dev.php/demo/hello/george
Installation of Symfony

6. Next Tutorial CRUD Operation in Symfony