Temperature and Humidity Sensor DHT11 in Arduino with Java and JfreeChart
1. Problem Statement
In this tutorial we will learn how use temperature and humidity sensor from the environment using DHT11 in Arduino and process the information in Java via serial Port. We will show the temperature in Celsius degree and Humidity in percentage using JFreeChart open source library.2. JFreeChart
JFreeChart is an open-source framework library for the programming language Java, which allows the creation of a wide variety of both interactive and non-interactive charts. A free Java chart library. JFreeChart supports pie charts (2D and 3D), bar charts (horizontal and vertical, regular and stacked), line charts, scatter plots, time series charts, high-low-open-close charts, candlestick plots, Gantt charts, combined plots, thermometers, dials and more. JFreeChart can be used in applications, applets, servlets, JSP and JSF. You can download from the official web site jfreechart3. Temperature and Humidity Sensor DHT11
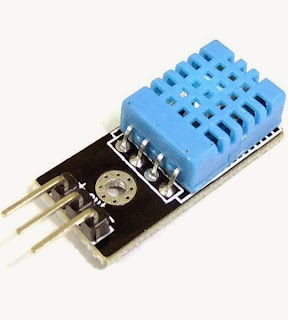
The DHT11 is a basic, ultra low cost digital temperature and humidity sensor. It uses a capacitive humidity sensor and a thermostat to measure the surrounding air, and spits out a digital signal on the data pin. It's fairly simple to use, but requires careful timing to grab data. The only real downside of this sensor is you can only get new data from it once every 2 seconds. In the market you will find many models, some of them have 3 or 4 pins, so be carefully and read the technical specifications.The technical specification of DHT11 are:
- 3 to 5V power and I/O
- 2.5mA max current use during conversion (while requesting data)
- Good for 20-80% humidity readings with 5% accuracy
- Good for 0-50°C temperature readings ±2°C accuracy
- No more than 1 Hz sampling rate (once every second)
- Body size 15.5mm x 12mm x 5.5mm
- 3 pins with 0.1" spacing
4. Sketch for this project
For implement this project we will required the following materials:- DHT11 temperature and humidity sensor
- Wires
- Arduino UNO R3
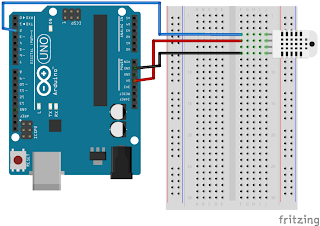
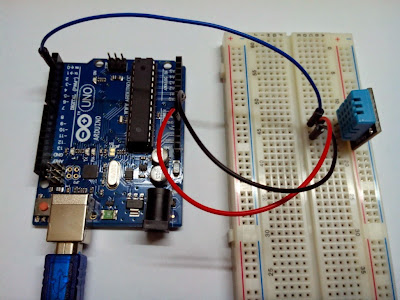
In the next figure we can see the first pin is connected to pin digital 2 in arduino board, the middle one to 5v and the last one is connected to GND.
5. Arduino Source Code to get Temperature and Humidity from DHT11
The source code in arduino is not so complicated, as we can see first you need to add the library dht11.h to start to use DHT11 temperature and humidity sensor and then define the digital pin you will use to read the information from the sensor and finally read the information from dht11 sensor (temperature and humidity) and print in the serial port for further reading from C#.
#include <dht11.h>
//Declare objects
dht11 DHT11;
//Pin Numbers
#define DHT11PIN 2

void setup()
{
  Serial.begin(9600);
}

void loop()
{
  int chk = DHT11.read(DHT11PIN);
  //read temperature in celsius degree and print in the serial port
  Serial.print(DHT11.humidity);
  Serial.print(",");
  //read humidity and print in the serial port
  Serial.print(DHT11.temperature);
  Serial.println();
  delay(2000);
}
6. Designing Project in Java to Show Temperature and Humidity using JFreeChart
First create a java project in Netbeans, in your project go to Libraries folder, right click choose Add JAR/Folder and add the following libraries. Please replace the version numbers with the version you are using.- jcommon-1.0.21.jar
- jfreechart-1.0.17.jar
Java Source Code
In this part we need to create a Class for manage serial Port in Java, for this you can see in this link the java class provide by arduino web site, where also you find the explanation, I modified a little bit that class according to what I want to do, the source code of my class is the following.
import gnu.io.CommPortIdentifier;
import gnu.io.SerialPort;
import java.io.BufferedReader;
import java.io.InputStreamReader;
import java.io.OutputStream;
import java.util.Enumeration;

/**
 *
 * @author george serrano, develop for http://georgehk.blogspot.com
 */
public class SerialPortCommunication {

  //SerialPort
  public SerialPort serialPort;
  //The port we're normally going to use.
  private static final String PORT_NAMES[] = {
      "/dev/tty.usbserial-A9007UX1", // Mac OS X
      "/dev/ttyUSB0", // Linux
      "COM4", // Windows
  };
  //input and output Stream
  private BufferedReader input;
  private OutputStream output;
  //Milliseconds to block while waiting for port open
  public static final int TIME_OUT = 1000;
  //Default bits per second for COM port.
  public static final int DATA_RATE = 9600;
  public void initialize() {
    CommPortIdentifier portId = null;
    Enumeration portEnum = CommPortIdentifier.getPortIdentifiers();
    //First, Find an instance of serial port as set in PORT_NAMES.
    while (portEnum.hasMoreElements()) {
       CommPortIdentifier currPortId = (CommPortIdentifier)
                                         portEnum.nextElement();
       for (String portName : PORT_NAMES) {
         if (currPortId.getName().equals(portName)) {
            portId = currPortId;
            break;
         }
       }
    }
    if (portId == null) {
       System.out.println("Could not find COM port.");
       return;
    }
    try {
       // open serial port, and use class name for the appName.
       serialPort = (SerialPort) portId.open(this.getClass().getName(),
                                                            TIME_OUT);
       // set port parameters
       serialPort.setSerialPortParams(DATA_RATE,
            SerialPort.DATABITS_8,
            SerialPort.STOPBITS_1,
            SerialPort.PARITY_NONE);
       // open the streams for reading and writing in the serial port
       input = new BufferedReader(new
               InputStreamReader(serialPort.getInputStream()));
       output = serialPort.getOutputStream();
    } catch (Exception e) {
      System.err.println(e.toString());
    }
    }
    public void writeData(String data) {
        try {
            //write data in the serial port
            output.write(data.getBytes());
        } catch (Exception e) {
            System.out.println("could not write to port");
        }
    }

    public String getData() {
        String data = null;
        try {
            //read data from the serial port
            data = input.readLine();
        } catch (Exception e) {
            return e.getMessage();
        }
        return data;
    }
}
Also we need to instantiate an object of this class in JFrame's constructor
public frmTemperatureArduinoUNO() {
        initComponents();

        //initialize serial Port
        serialPortCommunication = new SerialPortCommunication();
        serialPortCommunication.initialize();
}
The last steep is implement the source code for Get Temperature Humidity Button
private void jbtnShowTemperatureHumidityActionPerformed
   (java.awt.event.ActionEvent evt) {
   // TODO add your handling code here:
   jtxtHumidity.setText(null);
   jtxtTemperature.setText(null);
   //set temperature in 0
   datasetTemperature.setValue(0);
   //set humidity in 0
   datasetHumidity.setValue(0);
   try {
      int temperature, humidity;
      //get temperature and humidity from serial port
      //sent by arduino and save in temporal string
      String temperatureHumidityArduino =
         serialPortCommunication.getData();
      //split temperature and humidity
      //divided by commas and save in array
      String[] temperatureHumidity =
         temperatureHumidityArduino.split(",");
      //get temperature from array and convert to integer
      temperature = Integer.parseInt(temperatureHumidity[0]);
      //get humidity from array and convert to integer
      humidity = Integer.parseInt(temperatureHumidity[1]);
      //show temperature and humidity in JTextBoxes
      jtxtTemperature.setText(String.valueOf(temperature) + " °C");
      jtxtHumidity.setText(String.valueOf(humidity) + " %");

        //draw temperature
        drawDataSetJfreeChart(temperature, datasetTemperature,
                              jSliderTemperature);
        //draw humidity
        drawDataSetJfreeChart(humidity, datasetHumidity,
                               jSlideHumidity);
     } catch (Exception e) {
        System.out.println(e.getMessage());
     }
}
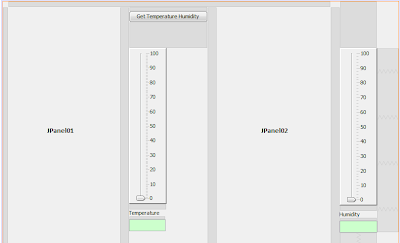
Once you run the project it will show the next window, where we can see two thermometers, one of them for showing the temperature and another to show humidity, also two extra JSliders to probe the right measurement of those thermometers, and finally two JTextBoxes for showing the temperature and humidity in numbers.
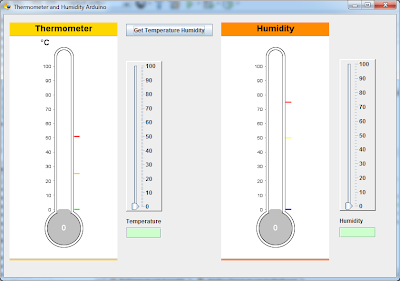
7. Running Project
Before run the project make sure the Arduino in writing the temperature and humidity to serial port. Just press F6 to run the project and you will see the program start to looking for serial port open. After press Get Temperature Humidity Button, our program will read temperature and humidity from serial port and draw them in thermometer and humidity chart like depicted in the next figure.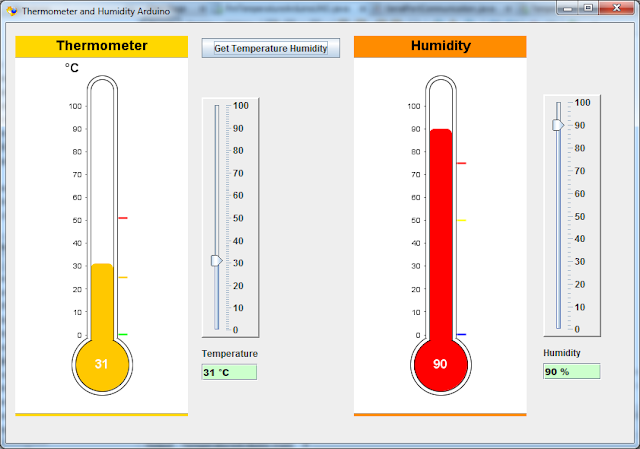
video tutorial in youtube
hi, what is the library is "DHT11" you use ?. I found some errors. Can you please send it to me?
ReplyDeleteThe DHT11 is a basic, ultra low cost digital temperature and humidity sensor. It uses a capacitive humidity sensor and a thermostat to measure ... temphumiditymeter.blogspot.com
ReplyDeleteHi, i'm with some troubles trying to set the temperature on jThermometer, can u show how you did?
ReplyDeleteThe method 'drawDataSetJfreeChart', the code is not here, you also hide the code on your video tutorial.... Please can you share it with us.....
ReplyDeleteRegards.
Can you fix this problem?
Deletecan i have this project?
ReplyDeleteHi all, here every person is sharing these kinds of know-how, so it’s nice to read this website about Temperature and Humidity Sensor DHT11 in Arduino with Java, and I used to go to see these kind of blog daily.
ReplyDeleteThe Best Dental Websites Company for Dentists in America.
I think something hide in your tutorial and also in your video.
ReplyDeleteHello Jorge, The task which you have done is splendid. But we are stuck up in the middle of no where, even after struggling too much, we are unable to figure out the "code part" which is missing in the video as well as you blog. Please please let who are eager(like me as well), get that remaining help from your project. Especially the drawingchart and statechange(of the jslider) part. from here and there I am able to draw the thermometer(but not like yours)...and for updating I have to keep on clicking the "Get Temp and humidity" button...please email it to my email id symmer10@gmail.com,, others if you are able to do it, please share it with me. Thank you
ReplyDeleteHello george, I have a lot of doubts about your code, could you share it with me, please?
ReplyDeleteEmail: zeradmn117@gmail.com
Thanks for sharing...
ReplyDeletehumidity controller, humidity meter, humidity indicator
ReplyDeleteIt seems you are so busy in last month. The detail you shared about your work and it is really impressive that's why i am waiting for your post because i get the new ideas over here and you really write so well.
Selenium training in Chennai
Selenium training in Bangalore
Selenium training in Pune
Selenium Online training
Useful information.I am actual blessed to read this article.thanks for giving us this advantageous information.I acknowledge this post.and I would like bookmark this post.Thanks
ReplyDeletepython course institute in bangalore
python Course in bangalore
python training institute in bangalore
Hello george,I need the code for a very important project
ReplyDeleteEmail:luiscardona1070@gmail.com
Berpindah meja/room juga dapat membantu Anda, karena jika Anda tidak mendapatkan keberuntungan pada meja pertama yang Anda masuki
ReplyDeleteasikqq
dewaqq
sumoqq
interqq
pionpoker
bandar ceme
hobiqq
paito warna terlengkap
Syair HK