Java, C#, Symfony, Laravel, Android, Xcode, Arduino Please Donate: https://streamlabs.com/georgesqhk
Friday, June 27, 2014
George's Blog (Software Development): Temperature and Humidity Sensor DHT11 in Arduino w...
George's Blog (Software Development): Temperature and Humidity Sensor DHT11 in Arduino w...: Temperature and Humidity Sensor DHT11 in Arduino with Java and JfreeChart 1. Problem Statement In this tutorial we will learn how use te...
Temperature and Humidity Sensor DHT11 in Arduino with Java and Jfreechart
Temperature and Humidity Sensor DHT11 in Arduino with Java and JfreeChart
1. Problem Statement
In this tutorial we will learn how use temperature and humidity sensor from the environment using DHT11 in Arduino and process the information in Java via serial Port. We will show the temperature in Celsius degree and Humidity in percentage using JFreeChart open source library.2. JFreeChart
JFreeChart is an open-source framework library for the programming language Java, which allows the creation of a wide variety of both interactive and non-interactive charts. A free Java chart library. JFreeChart supports pie charts (2D and 3D), bar charts (horizontal and vertical, regular and stacked), line charts, scatter plots, time series charts, high-low-open-close charts, candlestick plots, Gantt charts, combined plots, thermometers, dials and more. JFreeChart can be used in applications, applets, servlets, JSP and JSF. You can download from the official web site jfreechart3. Temperature and Humidity Sensor DHT11
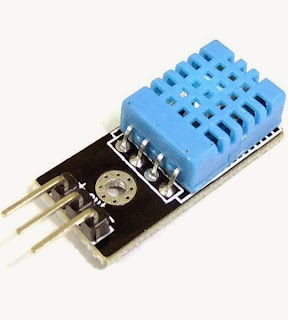
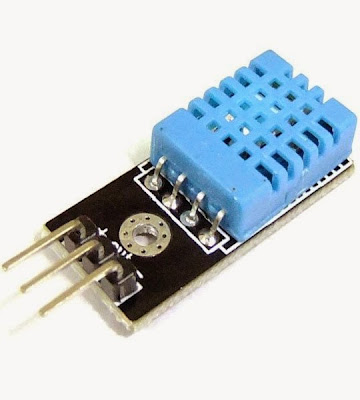
The DHT11 is a basic, ultra low cost digital temperature and humidity sensor. It uses a capacitive humidity sensor and a thermostat to measure the surrounding air, and spits out a digital signal on the data pin. It's fairly simple to use, but requires careful timing to grab data. The only real downside of this sensor is you can only get new data from it once every 2 seconds. In the market you will find many models, some of them have 3 or 4 pins, so be carefully and read the technical specifications.The technical specification of DHT11 are:
- 3 to 5V power and I/O
- 2.5mA max current use during conversion (while requesting data)
- Good for 20-80% humidity readings with 5% accuracy
- Good for 0-50°C temperature readings ±2°C accuracy
- No more than 1 Hz sampling rate (once every second)
- Body size 15.5mm x 12mm x 5.5mm
- 3 pins with 0.1" spacing
4. Sketch for this project
For implement this project we will required the following materials:- DHT11 temperature and humidity sensor
- Wires
- Arduino UNO R3
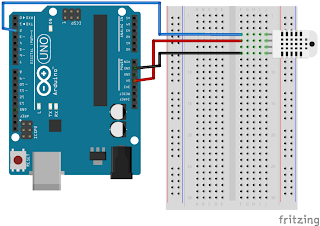
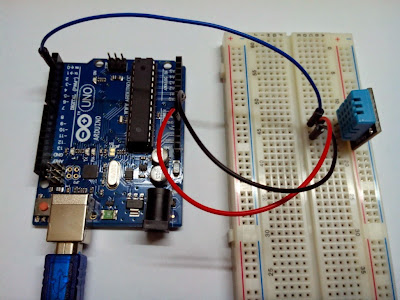
In the next figure we can see the first pin is connected to pin digital 2 in arduino board, the middle one to 5v and the last one is connected to GND.
5. Arduino Source Code to get Temperature and Humidity from DHT11
The source code in arduino is not so complicated, as we can see first you need to add the library dht11.h to start to use DHT11 temperature and humidity sensor and then define the digital pin you will use to read the information from the sensor and finally read the information from dht11 sensor (temperature and humidity) and print in the serial port for further reading from C#.
#include <dht11.h>
//Declare objects
dht11 DHT11;
//Pin Numbers
#define DHT11PIN 2

void setup()
{
  Serial.begin(9600);
}

void loop()
{
  int chk = DHT11.read(DHT11PIN);
  //read temperature in celsius degree and print in the serial port
  Serial.print(DHT11.humidity);
  Serial.print(",");
  //read humidity and print in the serial port
  Serial.print(DHT11.temperature);
  Serial.println();
  delay(2000);
}
6. Designing Project in Java to Show Temperature and Humidity using JFreeChart
First create a java project in Netbeans, in your project go to Libraries folder, right click choose Add JAR/Folder and add the following libraries. Please replace the version numbers with the version you are using.- jcommon-1.0.21.jar
- jfreechart-1.0.17.jar
Java Source Code
In this part we need to create a Class for manage serial Port in Java, for this you can see in this link the java class provide by arduino web site, where also you find the explanation, I modified a little bit that class according to what I want to do, the source code of my class is the following.
import gnu.io.CommPortIdentifier;
import gnu.io.SerialPort;
import java.io.BufferedReader;
import java.io.InputStreamReader;
import java.io.OutputStream;
import java.util.Enumeration;

/**
 *
 * @author george serrano, develop for http://georgehk.blogspot.com
 */
public class SerialPortCommunication {

  //SerialPort
  public SerialPort serialPort;
  //The port we're normally going to use.
  private static final String PORT_NAMES[] = {
      "/dev/tty.usbserial-A9007UX1", // Mac OS X
      "/dev/ttyUSB0", // Linux
      "COM4", // Windows
  };
  //input and output Stream
  private BufferedReader input;
  private OutputStream output;
  //Milliseconds to block while waiting for port open
  public static final int TIME_OUT = 1000;
  //Default bits per second for COM port.
  public static final int DATA_RATE = 9600;
  public void initialize() {
    CommPortIdentifier portId = null;
    Enumeration portEnum = CommPortIdentifier.getPortIdentifiers();
    //First, Find an instance of serial port as set in PORT_NAMES.
    while (portEnum.hasMoreElements()) {
       CommPortIdentifier currPortId = (CommPortIdentifier)
                                         portEnum.nextElement();
       for (String portName : PORT_NAMES) {
         if (currPortId.getName().equals(portName)) {
            portId = currPortId;
            break;
         }
       }
    }
    if (portId == null) {
       System.out.println("Could not find COM port.");
       return;
    }
    try {
       // open serial port, and use class name for the appName.
       serialPort = (SerialPort) portId.open(this.getClass().getName(),
                                                            TIME_OUT);
       // set port parameters
       serialPort.setSerialPortParams(DATA_RATE,
            SerialPort.DATABITS_8,
            SerialPort.STOPBITS_1,
            SerialPort.PARITY_NONE);
       // open the streams for reading and writing in the serial port
       input = new BufferedReader(new
               InputStreamReader(serialPort.getInputStream()));
       output = serialPort.getOutputStream();
    } catch (Exception e) {
      System.err.println(e.toString());
    }
    }
    public void writeData(String data) {
        try {
            //write data in the serial port
            output.write(data.getBytes());
        } catch (Exception e) {
            System.out.println("could not write to port");
        }
    }

    public String getData() {
        String data = null;
        try {
            //read data from the serial port
            data = input.readLine();
        } catch (Exception e) {
            return e.getMessage();
        }
        return data;
    }
}
Also we need to instantiate an object of this class in JFrame's constructor
public frmTemperatureArduinoUNO() {
        initComponents();

        //initialize serial Port
        serialPortCommunication = new SerialPortCommunication();
        serialPortCommunication.initialize();
}
The last steep is implement the source code for Get Temperature Humidity Button
private void jbtnShowTemperatureHumidityActionPerformed
   (java.awt.event.ActionEvent evt) {
   // TODO add your handling code here:
   jtxtHumidity.setText(null);
   jtxtTemperature.setText(null);
   //set temperature in 0
   datasetTemperature.setValue(0);
   //set humidity in 0
   datasetHumidity.setValue(0);
   try {
      int temperature, humidity;
      //get temperature and humidity from serial port
      //sent by arduino and save in temporal string
      String temperatureHumidityArduino =
         serialPortCommunication.getData();
      //split temperature and humidity
      //divided by commas and save in array
      String[] temperatureHumidity =
         temperatureHumidityArduino.split(",");
      //get temperature from array and convert to integer
      temperature = Integer.parseInt(temperatureHumidity[0]);
      //get humidity from array and convert to integer
      humidity = Integer.parseInt(temperatureHumidity[1]);
      //show temperature and humidity in JTextBoxes
      jtxtTemperature.setText(String.valueOf(temperature) + " °C");
      jtxtHumidity.setText(String.valueOf(humidity) + " %");

        //draw temperature
        drawDataSetJfreeChart(temperature, datasetTemperature,
                              jSliderTemperature);
        //draw humidity
        drawDataSetJfreeChart(humidity, datasetHumidity,
                               jSlideHumidity);
     } catch (Exception e) {
        System.out.println(e.getMessage());
     }
}
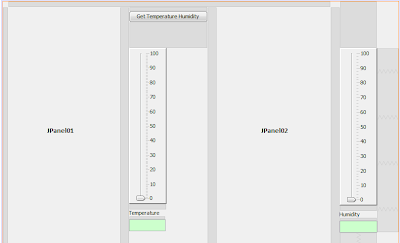
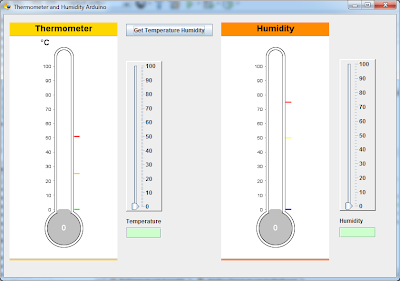
Once you run the project it will show the next window, where we can see two thermometers, one of them for showing the temperature and another to show humidity, also two extra JSliders to probe the right measurement of those thermometers, and finally two JTextBoxes for showing the temperature and humidity in numbers.
7. Running Project
Before run the project make sure the Arduino in writing the temperature and humidity to serial port. Just press F6 to run the project and you will see the program start to looking for serial port open. After press Get Temperature Humidity Button, our program will read temperature and humidity from serial port and draw them in thermometer and humidity chart like depicted in the next figure.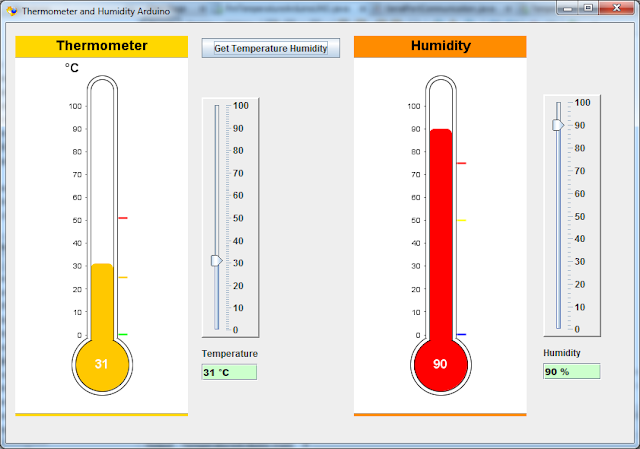
video tutorial in youtube
Friday, May 16, 2014
Temperature and Humidity Sensor DHT11 in Arduino with C#
Temperature and Humidity Sensor DHT11 in Arduino with C#
1. Problem Statement
In this tutorial we will learn how use sensor to get temperature and humidity from the environment using DHT11 Sensor in Arduino and process the information in C# via the serial Port. We will show the temperature in Celsius and Humidity.2. Temperature and Humidity Sensor DHT11
The DHT11 is a basic, ultra low cost digital temperature and humidity sensor. It uses a capacitive humidity sensor and a thermostat to measure the surrounding air, and spits out a digital signal on the data pin. It's fairly simple to use, but requires careful timing to grab data. The only real downside of this sensor is you can only get new data from it once every 2 seconds. In the market you will find many models, some of them have 3 or 4 pins, so be carefully and read the technical specifications. The technical specification of DHT11 are:- 3 to 5V power and I/O
- 2.5mA max current use during conversion (while requesting data)
- Good for 20-80% humidity readings with 5% accuracy
- Good for 0-50°C temperature readings ±2°C accuracy
- No more than 1 Hz sampling rate (once every second)
- Body size 15.5mm x 12mm x 5.5mm
- 3 pins with 0.1" spacing
3. Sketch for this project
For implement this project we will required the following materials:- DHT11 temperature and humidity sensor
- Wires
- Arduino UNO R3
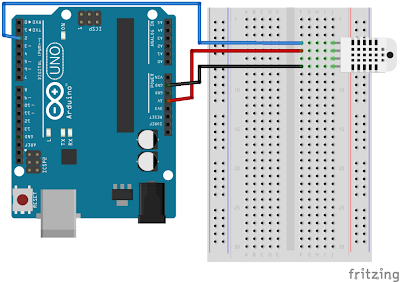
In the next figure we can see the first pin is connected to pin digital 2 in arduino board, the middle one to 5v and the last one is connected to GND.
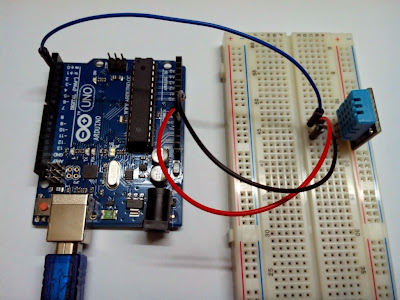
4. Arduino Source Code to get Temperature and Humidity from DHT11
The source code in arduino is not so complicated, as we can see first you need to add the library dht11.h to start to use DHT11 temperature and humidity sensor and then define the digital pin you will use to read the information from the sensor and finally read the information from dht11 sensor (temperature and humidity) and print in the serial port for further reading from C#.
#include <dht11.h>
//Declare objects
dht11 DHT11;
//Pin Numbers
#define DHT11PIN 2
void setup()
{
  Serial.begin(9600);
}
void loop()
{
  int chk = DHT11.read(DHT11PIN);
  //read temperature in celsius degree and print in the serial port
  Serial.print((float)DHT11.humidity, 2);
  Serial.print(",");
  //read humidity and print in the serial port
  Serial.print((float)DHT11.temperature, 2);
  Serial.println();
  delay(2000);
}
5. Designing Project in C# to Show the Temperature and Humidity
To implement this project using C# we require to draw a gauge control and a needle, in my case I draw them using photoshop for displaying temperature and put the gauge picture in a PictureBox control and for movement of the needle we will make programmatically. Also we need a couple of TextBox to show the temperature, humidity and time. Every 10 seconds we will update the temperature and humidity so we need to use Timer controls and finally we will need a SerialPort control to read the information from the serial port. The design of the interface is shown in the next figure.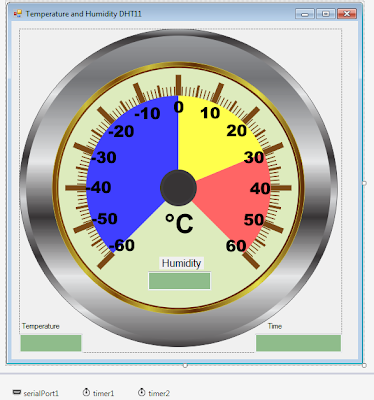
C# Source Code
As we can see this is the main part of the c# source code for this project, we split the information we get from arduino separate by commas into temperature and humidity and then draw that temperature in the gauge control.
private void timer1_Tick(object sender, EventArgs e)
{
    //read temperature and humidity every 10 seconds
    timer1.Interval = 10000;
    //read information from the serial port
    String dataFromArduino = serialPort1.ReadLine().ToString();
    //separete temperature and humidity and save in array
    String[] dataTempHumid = dataFromArduino.Split(',');
    //get temperature and humidity
    int Humidity =
    (int)(Math.Round(Convert.ToDecimal(dataTempHumid[0]),0));
    int Temperature =
    (int)(Math.Round(Convert.ToDecimal(dataTempHumid[1]),0));
    //draw temperature in the graphic
    drawTemperature(Temperature);
    txtHumidity.Text = Humidity.ToString()+" %";
    txtTemperatureCelsius.Text = Temperature.ToString()+" °C";
}
private void timer2_Tick(object sender, EventArgs e)
{
    txtTime.Text = DateTime.Now.ToLongTimeString();
}
private void frmTemperatureHumidity_Load(object sender, EventArgs e)
{
    needle = Image.FromFile("needle2.png");
     serialPort1.Open();
}
6. Running Project
Just press F5 to run the project and you will see the program start to read from the serial port and show in the gauge control, and every 10 seconds it will update with the new information getting from the DHT11 sensor.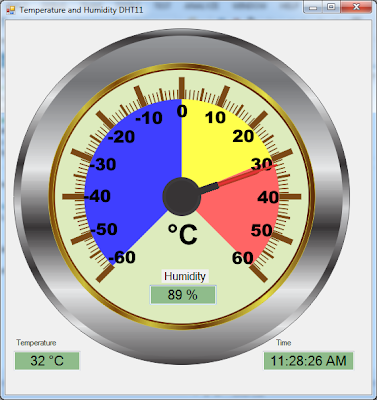
you could see all the implementation in youtube here
Wednesday, May 7, 2014
George's Blog (Software Development): Temperature Sensor LM35 in Arduino with C#
George's Blog (Software Development): Temperature Sensor LM35 in Arduino with C#: Temperature sensor LM35 in Arduino with CSharp 1. Problem Statement In this tutorial we will learn how use temperature sensor LM35 to ge...
Temperature Sensor LM35 in Arduino with C#
Temperature sensor LM35 in Arduino with CSharp
1. Problem Statement
In this tutorial we will learn how use temperature sensor LM35 to get temperature from the environment in Arduino and process the information in C# via the serial Port, Also we will show the temperature in Celsius and Fahrenheit degrees.2. LM35 Precision Centigrade Temperature Sensors
The LM35 is integrated-circuit temperature sensor, whose output voltage is linearly proportional to the Celsius (Centigrade) temperature. The LM35 thus has an advantage over linear temperature sensors calibrated in ° Kelvin, as the user is not required to subtract a large constant voltage from its output to obtain convenient Centigrade scaling. The LM35 does not require any external calibration or trimming to provide typical accuracies of ±1⁄4°C at room temperature and ±3⁄4°C over a full −55 to +150°C temperature range. Low cost is assured by trimming and calibration at the wafer level.. The LM35 is rated to operate over a −55° to +150°C temperature range.Previously we need to understand couple of things, so to connect it to Arduino, you must connect VCC to Arduino 5V, GND to Arduino GND, and the middle pin you must connect to an Analog Pin, in my case we will use A0(Analog pin). This projects doesn't need any resistor or capacitor between the Arduino and the Sensor, but you need to know that Arduino ADC has a precision of 10 bits. This means:
5V / 2^10 = 5V / 1024, so 0.0049 is our factor. To get the temperature in Celsius from LM35, we calculate like this: Temperature Celsius = (pinA0 * 0.0049)*100
3. Sketch for this project
For implement this project we will required the following materials:- LM35 temperature sensor
- Couple of Wires
- Arduino UNO R3
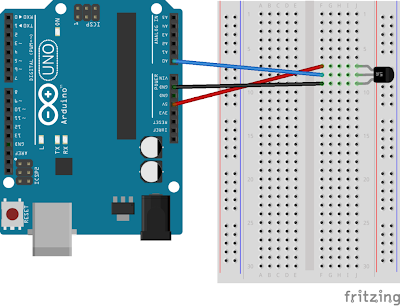
4. Source code to Get Temperature from LM35 in Arduino
Go to Arduino text Area and type de following code, first we define the analog Pin, sensorValue and temperature in Celsius, second we start to open communication for serial, third we get the voltage from LM35 and convert to celsius degree and write in the serial port and get the information from C# and show the temperature.
#define sensorPin 0 //A0 Pin
int sensorValue = 0;
float celsius = 0;
void setup() {
  Serial.begin(9600); //start Serial Port
}
void loop() {
  getTemperature();
  //send celsious value to Port and read from C#
  Serial.println(celsius);
  delay(1000);
}
void getTemperature(){
  //get sensorPin voltage
  sensorValue = analogRead(sensorPin);
  //convert voltage to celsius degree
  celsius = (sensorValue * 0.0049) *100;
}
5. Design Project in C# to show temperature in Celsius and Fahrenheit
Design an interface like depicted in next figure, for design the thermometer I used the Old GDI+, also we will add a TextBox to show the temperature get from serial Port and finally one Button to show the temperature in the thermometer.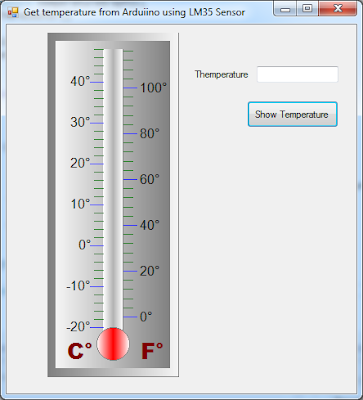
The next code is for button Show temperature, first we verify if the port is open and after get the temperature from serial port which was send by arduino and round this value and send that value to a function which is in charge to draw the current temperature in the thermometer.
private void btnShowTemperature_Click(object sender, EventArgs e)
{
  try
  {
     if (serialPort1.IsOpen)
     {
       //get Temperature from serial port sent by Arduino

       int temperature = (int)(Math.Round(Convert.ToDecimal(
                          serialPort1.ReadLine()), 0));
       txtTemperature.Text = temperature.ToString();
       //draw temperature in the thermometer
       DrawTemperatureLevel(temperature);
     }
   }
   catch (Exception ex)
   {
     MessageBox.Show(ex.Message);
   }
}
6. Running the project
First in arduino UNO R3 press the button Upload and then go to visual studio and run the project, second press the button Show Temperature and then it will show the temperature in the thermometer as shown next figure.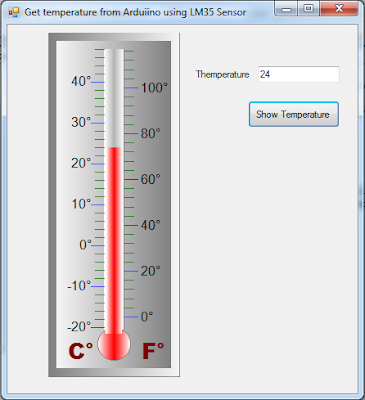
you can watch the video tutorial on youtube.
Monday, May 5, 2014
Turn ON and Turn OFF LED in Arduino using Visual Studio C#
Turn ON/OFF LED in Arduino Using Visual Studio
1. Problem Statement
In this tutorial we will learn how to Turn ON and Turn OFF a LED in arduino, but this time using Visual Studio using the serial Port and C# programming language.2. What is a serial interface?
A serial interface is used for information exchange between computers and peripheral devices. When using a serial communication, the information is sent bit by bit (serial) over a cable. Modern serial interfaces are Ethernet, Firewire, USB, RS-485, etc. For our project we will use the USB port.Visual Studio provide a serialPort control which we will use for this project.
3. Sketch for this project
We are going to use the sketch used in our first tutorial, which just need a LED, 100ohm resistors and wires to connect them with Arduino board, the next picture show the connections.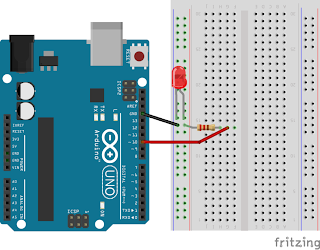
4. Source Code for Arduino
The source code for this project is simple to understand, but in this case we will get the information from the serial port dispatched by C# program and then we will verify to turn ON(1) or turn OFF(0), Type the following code in the text area of arduino the code is explained line by line.
#define BaudRate 9600
#define LEDPin    10
char incomingOption;

void setup()
{
  pinMode(LEDPin, OUTPUT);
  // serial communication
  Serial.begin(BaudRate);
}
void loop()
{
     //read from serial port getting information from VS 2013
     incomingOption = Serial.read();
     //verify incomingOption
     switch(incomingOption){
        case '1':
          // Turn ON LED
          digitalWrite(LEDPin, HIGH);
          break;
        case '0':
          // Turn OFF LED
          digitalWrite(LEDPin, LOW);
          break;
     }
}
5. Design the Interface in Visual Studio for communicate with Arduino
Design a interface with 3 buttons, the first one will turn ON the LED, the second one will turn OFF the LED and finally the third button will close the serial port.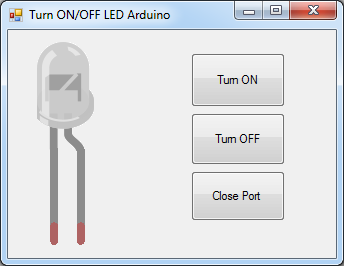
You need to drag and drop a serialPort control to the design area and set properties BaudRate to 9600 and PortName to COM4 and that's all for the design part.
Next we need to write the code for turning ON and Turning OFF.
public partial class frmTurnONTurnOFFLED : Form
{
   public frmTurnONTurnOFFLED()
   {
      InitializeComponent();
   }
   private void btnTurnON_Click(object sender, EventArgs e)
   {
      try
      {
         serialPort1.Write("1"); //send 1 to Arduino
      }
      catch (Exception ex)
      {
         MessageBox.Show(ex.Message);
      }
   }
   private void btnTurnOFF_Click(object sender, EventArgs e)
   {
      try
      {
         serialPort1.Write("0"); //send 0 to Arduino
      }
      catch (Exception ex)
      {
         MessageBox.Show(ex.Message);
      }
   }
   private void frmTurnONTurnOFFLED_Load(object sender, EventArgs e)
   {
      serialPort1.Open(); //open serialPort
   }
   private void btnClosePort_Click(object sender, EventArgs e)
   {
      serialPort1.Close(); //close serialPort
   }
}
Wednesday, April 30, 2014
Traffic Light Arduino UNO R3
1. Problem Statement
In this tutorial we are going to create a project to simulate a traffic light using arduino UNO R3 where the system will change from red to green, via amber and repeat this process again and again.2. What is a LED
A light-emitting diode (LED) is a two-lead semiconductor light source that resembles a basic pn-junction diode, except that an LED also emits light.An LED is a diode that also emits light. LEDs come in different colors and brightnesses, and can also emit light in the ultraviolet and infrared parts of the spectrum (as in the LEDs in your TV remote control). If you look carefully at an LED, you will notice two things. One is that the legs are of different lengths, and also, that on one side of the LED it is flattened rather than cylindrical (see Figure). These are indicators to show you which leg is the anode (positive) and which is the cathode (negative). The longer leg (anode) gets connected to the positive supply (3.3V) and the leg with the flattened side (cathode) goes to ground.

There is another LED called RGB LED which has a red, green, and blue one package. The LED has four legs: one will be a common anode or cathode, common to all three LEDs and the other three will then go to the anode or cathode of the individual red, green and blue LEDs. You can get any color you want just adjusting the brightness values of the R, G and B channels of the RGB LED.
3. Parts Required for Traffic Light
for implement this project we will need the following materials, breadboard, 3 LEDs(Red, Yellow and Green), 150ohm resistors(3) and jumpers wires to connect.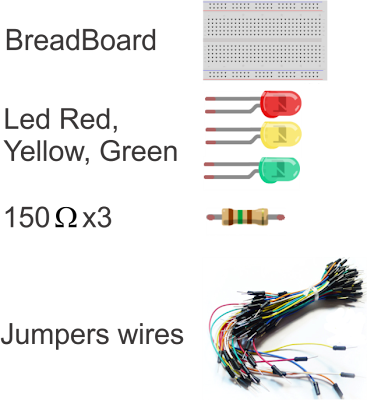
4. Sketch for Traffic Light
Using Fritzing we draw the following sketch for traffic light project, we just need to make some simple connection as we can see in the next figure.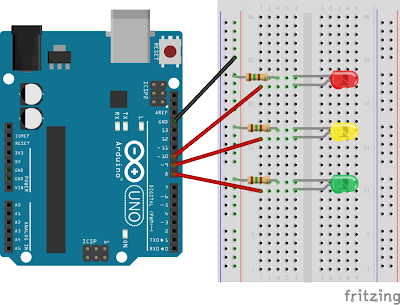
5. Coding traffic light
In this section we need to write some code for making run our traffic light project just type the following code in the text area of arduino editor. Make sure your arduino is not connected to computer while you assemble the project to avoid damage to the board.
//Traffic light in arduino UNO R3
int ledDelay = 10000; // delay in between changes
int redPin = 10;
int yellowPin = 9;
int bluePin = 8;
void setup() {
  pinMode(redPin, OUTPUT);
  pinMode(yellowPin, OUTPUT);
  pinMode(bluePin, OUTPUT);
}
void loop() {
  digitalWrite(redPin, HIGH); // turn the red light on
  delay(ledDelay); // wait 5 seconds

  digitalWrite(yellowPin, HIGH); // turn on yellow
  delay(2000); // wait 2 seconds

  digitalWrite(bluePin, HIGH); // turn green on
  digitalWrite(redPin, LOW); // turn red off
  digitalWrite(yellowPin, LOW); // turn yellow off
  delay(ledDelay); // wait ledDelay milliseconds

  digitalWrite(yellowPin, HIGH); // turn yellow on
  digitalWrite(bluePin, LOW); // turn green off
  delay(2000); // wait 2 seconds
  digitalWrite(yellowPin, LOW); // turn yellow off
  // now our loop repeats
}
Finally verify if there is not error and connect the arduino USB to your computer and then press in Upload Icon to run.You can see video demonstration on YouTube.
Tuesday, April 29, 2014
LED Blinking in Arduino UNO
LED Blinking in Arduino UNO R3
1. What is Arduino?
Arduino is an open-source electronics prototyping platform based on flexible, easy-to-use hardware and software. It's intended for artists, designers, hobbyists and anyone interested in creating interactive objects or environments.2. What Arduino can do
Arduino can sense the environment by receiving input from a variety of sensors and can affect its surroundings by controlling lights, motors, and other actuators. The microcontroller on the board is programmed using the Arduino programming language (based on Wiring) and the Arduino development environment (based on Processing). Arduino projects can be stand-alone or they can communicate with software running on a computer (e.g. Flash, Processing, MaxMSP).3. Arduino Boards
Browse the wide range of official Arduino boards| Arduino Boards | Arduino Boards |
4. Getting Starting with Arduino
Get the latest version from the download page.When the download finishes, unzip the downloaded file. Make sure to preserve the folder structure. Double-click the folder to open it. There should be a few files and sub-folders inside.
Connect the Arduino board to your computer using the USB cable. The green power LED (labelled PWR) should go on.
5. Installing drivers for Arduino Uno
It is important to follow the steps mentioned next to be able to use the Arduino Uno and some other boards. Please check the Arduino website for up-to-date references.- Plug your board in and wait for Windows to begin the driver installation process.
- Click on the Start menu, and open Control Panel.
- In Control Panel, navigate to System and Security. Next, click on System. Once the System window is up, open Device Manager.
- Look under Ports (COM & LPT). Check the open port named Arduino UNO.
- Right-click on the Arduino UNO port and choose the Update Driver Software option.
- Next, choose the Browse my computer for driver software option.
- Finally, navigate and select the Uno's driver file, named ArduinoUNO.inf, located in the Drivers folder of the Arduino software download.
- Windows will finish the driver installation from there and everything will be fine.
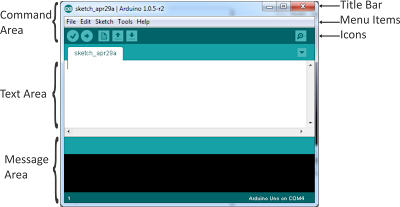
6. Creating Your First Sketch in the IDE
An Arduino sketch is a set of instructions that you create to accomplish a particular task you want to achieve; in other words, a sketch is a program.For the very first project, we are going to create the LED blink sketch. We will also learn exactly how the hardware and the software for this project works as we go, learning a bit about electronics and coding in the Arduino language (which is a variant of C).
Parts Required:
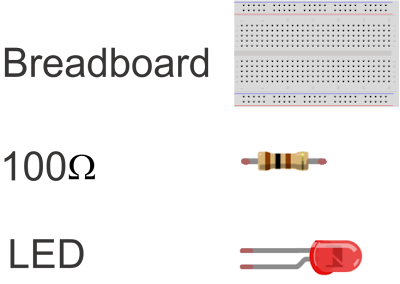
Let's see the sketch for this project, just connect the anode to GND and the Cathode to pin 10 of Arduino's board using 100ohm resistor.

In the text area type the code:
// LED blink Flasher
int ledPin = 10;
void setup() {
   pinMode(ledPin, OUTPUT);
}
void loop() {
   digitalWrite(ledPin, HIGH);
   delay(1000);
   digitalWrite(ledPin, LOW);
   delay(1000);
}
First press verify icon to check if there are some errors, after press upload icon to run your program, if you have done all correctly, you should see the LED blinking every second.
Friday, April 4, 2014
George's Blog (Software Development): CRUD Operation in Symfony with MYSQL
George's Blog (Software Development): CRUD Operation in Symfony with MYSQL: CRUD OPERATION IN SYMFONY WITH MYSQL ON WINDOWS 7 1. The Database The symfony framework supports all PDO-supported databases (MySQL, Po...
CRUD Operation in Symfony with MYSQL
CRUD OPERATION IN SYMFONY WITH MYSQL ON WINDOWS 7
1. The Database
The symfony framework supports all PDO-supported databases (MySQL, PostgreSQL, SQLite, Oracle, MSSQL, …).
PDO is the database abstraction layer|Database Abstraction Layer bundled with PHP.
2. The ORM
Databases are relational. PHP 5 and symfony are object-oriented. In order to access the database in an object-oriented way, an interface translating the object logic to the relational logic is required. This interface is called an object-relational mapping, or ORM.
An ORM is made up of objects that give access to data and keep business rules within themselves. One benefit of an object/relational abstraction layer is that it prevents you from using a syntax that is specific to a given database. It automatically translates calls to the model objects to SQL queries optimized for the current database.
Thanks to the database description from the schema.yml file, we can use some Doctrine built-in tasks to generate the SQL statements needed to create the database tables:
First in order to generate the SQL you must build your models from your schema files.
3. Routing
Symfony2 routes the request to the code that handles it by trying to match the requested URL (i.e. the virtual path) against some configured paths. By default, these paths (called routes) are defined in the app/config/routing.yml configuration file.
4. What is a bundle
A bundle is a directory that has a well-defined structure and can host anything from classes to controllers and web resources(PHP files, stylesheets, javascript files, etc). Even if bundles are very flexible, you should follow some best practices if you want to distribute them.
In our application we will create only one bundle that is responsible for everything that has to do with the news pages.
Bundles also act like plugins. This means you can create new bundles yourself that will hold all the code for a specific feature or you can register an external bundle created by someone else. When you create new bundle you don’t need to create all the folders and manually register the bundle with Symfony all this will be done automatically.
5. Bundle Name
A bundle is also a PHP namespace. The namespace must follow the technical interoperability standards for PHP 5.3 namespaces and class names: it starts with a vendor segment, followed by zero or more category segments, and it ends with the namespace short name, which must end with a Bundle suffix.
A namespace becomes a bundle as soon as you add a bundle class to it. The bundle class name must follow these simple rules:
- Use only alphanumeric characters and underscores;
- Use a CamelCased name;
- Use a descriptive and short name (no more than 2 words);
- Prefix the name with the concatenation of the vendor (and optionally the category namespaces);
- Suffix the name with Bundle.
| Namespace | Bundle Class Name |
| Acme\Bundle\BlogBundle | AcmeBlogBundle |
| Acme\Bundle\Social\BlogBundle | AcmeSocialBlogBundle |
| Acme\BlogBundle | AcmeBlogBundle |
6. How to create a bundle
Let's start to creating our bundle in our project called Bookstore which was created in the preview tutorial. Open a command line and enter command for creating bundles.php app/console generate:bundleAfter it will ask the name of your bundle, let's enter the name trying to follow rules for namespaces
Bundle namespace: Perulib/EbookBundleAnd in the bundle class name leave it by default. Then just press enter in all questions.
Bundle name [PerulibEbookBundle]:
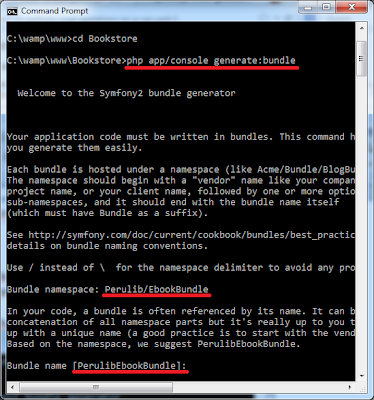
You can see our new bundle was created, just go to C:\wamp\www\Bookstore\src where all bundles are located (Acme bundle is created by default for demo purposes).
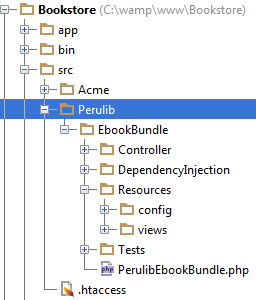
7. Configuration of the Database
You can create your tables using the command line and after can upload to database using doctrine or you can use reverse engineering to bring database tables to generate ORM and entities, for our case we will use the second option. Go to C:\wamp\www\Bookstore\app\config\parameters.yml and modify the name of the database name, user and password.
parameters:
    database_driver: pdo_mysql
    database_host: 127.0.0.1
    database_port: '3306'
    database_name: library
    database_user: root
    database_password: noseas@pepeelvivo
    mailer_transport: smtp
    mailer_host: 127.0.0.1
    mailer_user: null
    mailer_password: null
    locale: en
    secret: b7af9c6f9392bbd3dcacfeb0cc97e2ddec4f30bd
    database_path: null
In my case the database name: libraryTable name: books(id, isbn, title, author, publisher, language)
8. Creating a entity
Once we had configured our database we can create our ORM and Entity files. The first step towards building entity classes from an existing database is to ask Doctrine to introspect the database and generate the corresponding metadata files. Metadata files describe the entity class to generate based on table fields.php app/console doctrine:mapping:import --force PerulibEbookBundle xmlthis command will create our ORM files as you can see in the file location
you can take a look in C:\wamp\www\Bookstore\src\Perulib\EbookBundle\Resources\config\doctrine\Books.orm.xml
<?xml version="1.0" encoding="utf-8"?>
<doctrine-mapping xmlns="http://doctrine-project.org/schemas/orm
/doctrine-mapping" xmlns:xsi="http://www.w3.org/2001/
XMLSchema-instance" xsi:schemaLocation="http://doctrine-project.org/
schemas/orm/doctrine-mapping
http://doctrine-project.org/schemas/orm/doctrine-mapping.xsd">
  <entity name="Perulib\EbookBundle\Entity\Books" table="books">
    <id name="id" type="integer" column="id">
      <generator strategy="IDENTITY"/>
    </id>
    <field name="isbn" type="string" column="isbn" length="255"
    nullable="false"/>
    <field name="title" type="string" column="title" length="255"
    nullable="false"/>
    <field name="author" type="string" column="author" length="255"
    nullable="false"/>
    <field name="publisher" type="string" column="publisher"
    length="255" nullable="false"/>
    <field name="language" type="integer" column="language"
    nullable="false"/>
  </entity>
</doctrine-mapping>
Once the metadata files are generated, you can ask Doctrine to build related entity classes by executing the following two commands.php app/console doctrine:mapping:convert annotation ./src php app/console doctrine:generate:entities PerulibEbookBundleif you go to this location, you will see the complete class for the table books C:\wamp\www\Bookstore\src\Perulib\EbookBundle\Entity\Books.php
<?php
namespace Perulib\EbookBundle\Entity;
use Doctrine\ORM\Mapping as ORM;
/**
 * Books
 *
 * @ORM\Table(name="books")
 * @ORM\Entity
 */
class Books
{
    /**
     * @var string
     *
     * @ORM\Column(name="isbn", type="string", length=255,
       nullable=false)
     */
    private $isbn;
    /**
     * @var string
     *
     * @ORM\Column(name="title", type="string", length=255,
       nullable=false)
     */
     private $title;
/*other private fields and getters and setters*/
9. Generating a CRUD controller Based on a Doctrine Entity
In this section we will generate the CRUD operations, make sure you write exactly the name entity generated in step 8php app/console generate:doctrine:crud --entity=PerulibEbookBundle:Books --format=annotation --with-write --no-interaction

If you go to this folder C:\wamp\www\Bookstore\src\Perulib\EbookBundle\Resources\views, you will find a new folder called Books where is located all the CRUD operation.
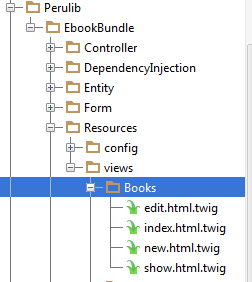
To make it run our project let's add our new bundle to our routing, for this edit the file located at C:\wamp\www\Bookstore\src\Perulib\EbookBundle\Resources\config\routing.yml and add the following lines of code.
PerulibEbookBundle:
    resource: "@PerulibEbookBundle/Controller/"
    type: annotation
    prefix: /
After this modification, you can open your browser and enter http://localhost/bookstore/web/app_dev.php/books/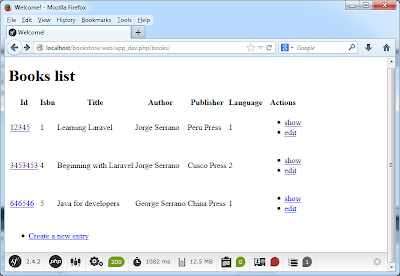
As we can see the presentation is not so good, so next step is give nice presentation adding bootstrap library.
10. Bootstrap with symfony
Let's edit the twig template page, all pages inherit from this base template. Go to C:\wamp\www\Bookstore\app\Resources\views\base.html.twig and add bootstrap css file.
<!DOCTYPE html>
<html>
    <head>
        <meta charset="UTF-8" />
        <link rel="stylesheet" href="//netdna.bootstrapcdn.com/
            bootstrap/3.1.1/css/bootstrap.min.css" rel="stylesheet">
        <title>{% block title %}Welcome!{% endblock %}</title>
        {% block stylesheets %}{% endblock %}
        <link rel="icon" type="image/x-icon"
            href="{{ asset('favicon.ico') }}" />
    </head>
    <body>
    <div class="container">
        {% block body %}{% endblock %}
        {% block javascripts %}{% endblock %}
    </div>
    </body>
</html>
Once have modified in all pages; for example change link option to buttons and that's all. Enjoy it!!!!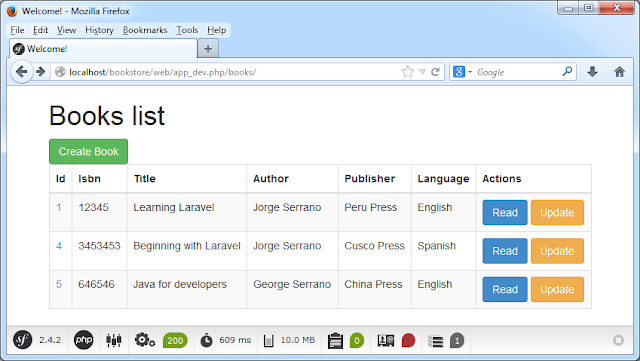
Thursday, April 3, 2014
George's Blog (Software Development): Installation and Configuration os Symfony2 on Wind...
George's Blog (Software Development): Installation and Configuration os Symfony2 on Wind...: INSTALLATION AND CONFIGURATION OF SYMFONY2 ON WINDOWS 7 1. What is Symfony? Symfony is an open source PHP web development framework desi...
Installation and Configuration os Symfony2 on Windows 7
INSTALLATION AND CONFIGURATION OF SYMFONY2 ON WINDOWS 7
1. What is Symfony?
Symfony is an open source PHP web development framework designed to optimize the development of web applications by way of several key features. For starters, it separates a web application’s business rules, server logic, and presentation views. It contains numerous tools and classes aimed at shortening the development time of a complex web application, but also for smaller functionalities needed for your project. Additionally, it automates common tasks so that the developer can focus entirely on the specifics of an application. The end result of these advantages means there is no need to reinvent the wheel every time a new web application is built.Symfony was written entirely in PHP 5. It has been thoroughly tested in various real-world projects, and is actually in use for high-demand e-business websites. It is compatible with most of the available databases engines, including MySQL, SQLite, PostgreSQL, Oracle, and Microsoft SQL Server. It runs on linux and Windows platforms.
2. Installation of Symfony
Before install Symfony, you should have the following requirements: WampServer Take a look about the WampServer and composer instalation in my preview tutorial.3. Installing Composer
Composer is the package manager used by modern PHP applications and the only recommended way to install Symfony2. To install Composer on a Windows system, download from the official web site executable installer.4. Create a symfony Project
Create a symfony project is not so complicated, but we need to know how do it for example using the command line.In this tutorial we will create a symfony project called Bookstore and in next tutorial we will implement simple CRUD operation using the same project.
Open a command line and execute the following command to install the latest version of Symfony2 in the "C:/wamp/www" directory:
composer create-project symfony/framework-standard-edition
Bookstore/ ~2.4
This will take time depend of your internet connection, because need to download all the files from the server of symfony and after it will ask you if you want to set up your database, let it by default and you can configure it later.

Go to \Bookstore\src\Acme\DemoBundle\Resources\views\Demo\hello.html.twig And add a line of code where say "Welcome to Symfony2 Development"
{% extends "AcmeDemoBundle::layout.html.twig" %}

{% block title "Hello " ~ name %}

{% block content %}

    <h1>Welcome to Symfony2 Development</h1>

    <h1>Hello {{ name }}!</h1>

{% endblock %}

{% set code = code(_self) %}
5. Run the Project
Before run Symfony2 for the first time, execute the following command to make sure that your system meets all the technical requirements:cd Bookstore/ php app/check.phpTry to fix the error appear and then use the PHP built-in web server to run Symfony:
Run the project
- This is one way to run the symfony application using the command line
php app/console server:run
Open a browser and access the http://localhost:8000/demo/hello/george - Or you can open with the complete path in case you don’t want to run the server(you must know that your wampserver should be running)
http://localhost/bookstore/web/app_dev.php/demo/hello/george

6. Next Tutorial CRUD Operation in Symfony
Sunday, March 16, 2014
Java Programming: CRUD Operations in laravel 4 with mysql
Java Programming: CRUD Operations in laravel 4 with mysql: CRUD Operations in Laravel 4 with MYSQL 1. INTRODUCTION Sometimes we need to create a CRUD operation for our projects, Create, Read, Upd...
CRUD Operations in laravel 4 with mysql
CRUD Operations in Laravel 4 with MYSQL
1. INTRODUCTION
Sometimes we need to create a CRUD operation for our projects, Create, Read, Update and Delete tables in database using Laravel. I admit it, Laravel is a complex framework, but once you understand how to manage it, it become easy and powerful framework for PHP development.At the end of this tutorial, you should be able to create a basic application where you can add, edit, delete and list Books.
2. CREATE A LARAVEL PROJECT
Create a project called bookshop3. CREATE TABLE
Before getting started, be sure to configure a database connection in app/config/database.php Just modify mysql connection.'mysql' => array( 'driver' => 'mysql', 'host' => 'localhost', 'database' => 'library', 'username' => 'root', 'password' => 'password', 'charset' => 'utf8', 'collation' => 'utf8_unicode_ci', 'prefix' => '', ),Using artisan, lets create a table and after that we will migrate to mysql database. For this, just open the console inside the project and type this line of command:
php artisan migrate:make create_books_table --create=books
This will create a php file in app/database/migrations.
The file have this name:
"####_##_##_######_create_books_table.php"
Open the file and add fields (id, isbn, title, author, publisher, language)
<?php
use Illuminate\Database\Schema\Blueprint;
use Illuminate\Database\Migrations\Migration;

class CreateBooksTable extends Migration {
 /**
  * Run the migrations.
  *
  * @return void
  */
 public function up()
 {
        //create table in the database
        Schema::create('books',function(Blueprint $table)
        {
            $table->increments("id");
            $table->string('isbn');
            $table->string('title');
            $table->string('author');
            $table->string('publisher');
            $table->integer('language');
            $table->timestamps();
        });
 }
 /**
  * Reverse the migrations.
  *
  * @return void
  */
 public function down()
 {
        //drop table if exist in the database
        Schema::drop('books');
 }
}
Now we need to migrate all this information into our database
in the command line type:php artisan migrate
Once you have executed the above command, this will create a table called books in our MYSQL database (no need to create manually books table, this is one of the artisan's advantages).
4. Create eloquent books model
The Eloquent ORM included with Laravel provides a beautiful, simple ActiveRecord implementation for working with your database. Each database table has a corresponding "Model" which is used to interact with that table. Now that we have our database, let’s create a simple book Eloquent model so that we can access the books in our database easily.Let's go to app/models folder and create a Books.php model and add the follow code(later we will add some more code to this model)
<?php
    class Book extends Eloquent
    {

    }
5. Create Book Controller
Let's create BookController, we can use artisan command for create it, in the command line type:php artisan controller:make BookController
<?php
class BookController extends \BaseController {
 /**
  * Display a listing of the resource.
  *
  * @return Response
  */
 public function index()
 {
  //
 }
 /**
  * Show the form for creating a new resource.
  *
  * @return Response
  */
 public function create()
 {
  //
 }
 /**
  * Store a newly created resource in storage.
  *
  * @return Response
  */
 public function store()
 {
  //
 }
 /**
  * Display the specified resource.
  *
  * @param  int  $id
  * @return Response
  */
 public function show($id)
 {
  //
 }
 /**
  * Show the form for editing the specified resource.
  *
  * @param  int  $id
  * @return Response
  */
 public function edit($id)
 {
  //
 }
 /**
  * Update the specified resource in storage.
  *
  * @param  int  $id
  * @return Response
  */
 public function update($id)
 {
  //
 }
 /**
  * Remove the specified resource from storage.
  *
  * @param  int  $id
  * @return Response
  */
 public function destroy($id)
 {
  //
 }
}
As we can see it create our BookController controller with all the methods we need, we need to implement it part by part.
6. Create routes for our Book CRUD
What Laravel provides us is that we can simply tap into either a GET or POST request via routes and send it to the appropriate method. Here is an example for that:Route::get('/register', 'BookController@showBookRegistration');
Route::post('/register', 'BookController@saveBook');
See the difference here is we are registering the same URL, /register, but we are defining its GET method so Laravel can call BookController class' showBookRegistration method. If it's the POST method, Laravel should call the saveBook method of the BookController class.
So let's create our route at /app/routes.php. Add the following line to the routes.php file: Route::resource('books','BookController');
<?php
Route::get('/', function()
{
 return View::make('hello');
});
Route::resource('books','BookController');
You can also use the following command to view the list of all the routes in your project from the root of your project, launching command line:php artisan routes
As you can see, resource Controller really makes your work easy. You don't have to create lots of routes.
7. Create view to show all books
Before create a view for show books, we need to know about Blade. Blade is a templating engine provided by Laravel. Blade has a very simple syntax, and you can determine most of the Blade expressions within your view files as they begin with "@".Blade syntax: {{ $var }}
PHP syntax:<?php echo $var; ?>
As we can see blade syntax is compact and easy to write.
In this section we will create blade templates and how to use it; and need to know that all Blade templates should use the .blade.php extension.
Now let's try to fetch books from our database via the Eloquent object. For this let's modify the index method in our app/controllers/BooksController.php.
public function index()
{
 //get all Books
        $booksList=Book::all();
        return View::make('books.index',compact('booksList'));
}
Where books are the folder in app/views/ and index will be the main page to show all booksNow let's create our template, create a folder called layouts in app/views and inside the new folder create a new file called book.blade.php and add the following code.
<!doctype html>
<html>
<head>
    <title>George's BookShop::Peru</title>
    <meta charset="utf-8">
<link rel="stylesheet" href="//maxcdn.bootstrapcdn.com/bootstrap/3.3.1/css/bootstrap.min.css">
   <style>
        table form { margin-bottom: 0; }
        form ul { margin-left: 0; list-style: none; }
        .error { color: red; font-style: italic; }
        body { padding-top: 20px; }
    </style>
</head>
<body>
<div class="container">
    @if (Session::has('message'))
    <div class="flash alert">
        <p>{{ Session::get('message') }}</p>
    </div>
    @endif

    @yield('main')
</div>
</body>
</html>
Now let's create the view for showing books, for this create a folder called books inside app/views and inside the new folder create a file called index.blade.php, and add the following code:
@extends('layouts/book')
@section('main')
<h1>Welcome to my bookshop</h1>
<p>{{ link_to_route('books.create', 'Create new book') }}</p>
@if ($booksList->count())
<table class="table table-striped table-bordered">
    <thead>
    <tr>
        <th>Id</th>
        <th>ISBN</th>
        <th>Title</th>
        <th>Author</th>
        <th>Publisher</th>
        <th>Language</th>
    </tr>
    </thead>

    <tbody>
    @foreach ($booksList as $book)
    <tr>
      <td>{{ $book->id }}</td>
      <td>{{ $book->isbn }}</td>
      <td>{{ $book->title }}</td>
      <td>{{ $book->author }}</td>
      <td>{{ $book->publisher }}</td>
      <td>@if ($book->language==1){{'English'}} @else{{'Spanish'}}
                @endif</td>
      <td>{{ link_to_route('books.show', 'Read', array($book->id),
                array('class' => 'btn btn-primary')) }}</td>
      <td>{{ link_to_route('books.edit', 'Update', array($book->id),
                array('class' => 'btn btn-warning')) }}</td>
      <td>
        {{ Form::open(array('method'=> 'DELETE', 'route' =>
              array('books.destroy', $book->id))) }}
        {{ Form::submit('Delete', array('class' => 'btn btn-danger')) }}
        {{ Form::close() }}
      </td>
    </tr>
    @endforeach
    </tbody>
</table>
@else
There are no books
@endif
@stop
If we have followed the complete tutorial until this part so means our index page should work, but first, we need to add a new row in books table, this just for testing, later we will implement "add new book". After this let's start our server with the following command inside our bookshop project:php artisan serve
As we can see, our server start to work
Let's open a brower and go to our books view and bravo!!!! It works :P
8. Create new Book
Now as we have listed our books, let's write the code for creating new book. To create a new book, we will need to create the Controller method and bind the view for displaying the new book form, so let's modify our BookController in /app/controllers/BookController.php and add just one line of code in create method:
public function create()
{
 //add new book form
       return View::make('books.create');
}
We know that this is calling create view which still not yet implemented, so let's create the a new file called create.blade.php inside /app/views/books and lets add the following code:
@extends('layouts.book')
@section('main')
<h1>Create Book</h1>
{{ Form::open(array('route' => 'books.store')) }}
<ul>
    <li>
        {{ Form::label('ISBN', 'ISBN:') }}
        {{ Form::text('isbn') }}
    </li>
    <li>
        {{ Form::label('Title', 'Title:') }}
        {{ Form::text('title') }}
    </li>
    <li>
        {{ Form::label('Author', 'Author:') }}
        {{ Form::text('author') }}
    </li>
    <li>
        {{ Form::label('Publisher', 'Publisher:') }}
        {{ Form::text('publisher') }}
    </li>
    <li>
        {{ Form::label('Language', 'Language') }}
        {{ Form::select('language', array('0' => 'Select a Level',
           '1' => 'English', '2' => 'Spanish'), Input::old('language'),
           array('class' => 'form-control')) }}
    </li>
    <li>
        {{ Form::submit('Save', array('class' => 'btn btn-primary')) }}
    </li>
</ul>
{{ Form::close() }}
@if ($errors->any())
<ul>
    {{ implode('', $errors->all('<li class="error">:message</li>')) }}
</ul>
@endif
@stop
Let's modify our Book Model /app/Models/Book.php, because our model needs to have the $fillable variable set, this variable is used to prevent mass assignment. See the documentation on mass-assignment for details.
<?php
class Book extends Eloquent{

    protected $fillable = array('isbn', 'title','author','publisher','language');

}
Now let's create our store method to save our book form data into our books table, open /app/controllers/BookController.php and add the following code:
public function store()
{
    //create a rule validation
    $rules=array(
          'isbn'=>'required',
          'title'=>'required',
          'author'=>'required',
          'publisher'=>'required',
          'language'=>'required|numeric'
    );
    //get all book information
    $bookInfo = Input::all();
    //validate book information with the rules
      $validation=Validator::make($bookInfo,$rules);
      if($validation->passes())
      {
      //save new book information in the database
      //and redirect to index page
          Book::create($bookInfo);
          return Redirect::route('books.index')
             ->withInput()
             ->withErrors($validation)
             ->with('message', 'Successfully created book.');
      }
      //show error message
      return Redirect::route('books.create')
           ->withInput()
           ->withErrors($validation)
           ->with('message', 'Some fields are incomplete.');
}
If we make click in Create New Book link we will redirect to create page depicted in the next figure:9. Update Book information
Now as we learned how easy it is to add and list books. Let's jump into updating a book.In our list books view we have the Update link with the following code:{{ link_to_route('books.edit', 'Update', array($book->idbook), array('class' => 'btn btn-warning')) }}
Here, the link_to_route function will generate a link /books/<id>/edit, which will call the resourceful Controller book, and Controller will bind it with the edit method, so let's modify edit and update methods in our BookController /app/controllers/BookController:
public function edit($id)
 {
        //get the current book by id
        $book = Book::find($id);
        if (is_null($book))
        {
            return Redirect::route('books.index');
        }
        //redirect to update form
        return View::make('books.edit', compact('book'));
}
public function update($id)
{
        //create a rule validation
        $rules=array(
            'isbn'=>'required',
            'title'=>'required',
            'author'=>'required',
            'publisher'=>'required',
            'language'=>'required|numeric'
        );
        $bookInfo = Input::all();
        $validation = Validator::make($bookInfo, $rules);
        if ($validation->passes())
        {
            $book = Book::find($id);
            $book->update($bookInfo);
            return Redirect::route('books.index')
                ->withInput()
                ->withErrors($validation)
                ->with('message', 'Successfully updated Book.');
        }
        return Redirect::route('books.edit', $id)
            ->withInput()
            ->withErrors($validation)
            ->with('message', 'There were validation errors.');
}
Now let's create our book edit view at /app/views/books/edit.blade.php, as follows:
@extends('layouts.book')
@section('main')
<h1>Edit Book</h1>
{{ Form::model($book, array('method' => 'PATCH',
'route' =>array('books.update', $book->id))) }}
<ul>
    <li>
        {{ Form::label('ISBN', 'ISBN:') }}
        {{ Form::text('isbn') }}
    </li>
    <li>
        {{ Form::label('Title', 'Title:') }}
        {{ Form::text('title') }}
    </li>
    <li>
        {{ Form::label('Author', 'Author:') }}
        {{ Form::text('author') }}
    </li>
    <li>
        {{ Form::label('Publisher', 'Publisher:') }}
        {{ Form::text('publisher') }}
    </li>
    <li>
        {{ Form::label('Language', 'Language') }}
        {{ Form::select('language', array('0' =>
          'Select a Level', '1' => 'English', '2' => 'Spanish'),
           null, array('class' => 'form-control')) }}
    </li>
    <li>
        {{ Form::submit('Update', array('class' =>
                 'btn btn-warning'))}}
        {{ link_to_route('books.show', 'Cancel', $book->
                  id,array('class' => 'btn btn-danger')) }}
    </li>
</ul>
{{ Form::close() }}
@if ($errors->any())
<ul>
    {{implode('',$errors->all('<li class="error">:message</li>'))}}
</ul>
@endif
@stop
After these modification our update function works, let's tried to update book information and we will get the next figure:
10. Delete Book
To delete a book we can use the destroy method. The same like update method If you go to our book lists view, you can find the following delete link's generation code:
{{ Form::open(array('method' => 'DELETE', 'route' =>
                 array('books.destroy', $book->id))) }}
{{ Form::submit('Delete', array('class' => 'btn btn-danger')) }}
{{ Form::close() }}
Let's go to BookController at /app/controllers/BookController.php this request will hit the destroy() method as follows:
public function destroy($id)
{
 //delete book
        Book::find($id)->delete();
        return Redirect::route('books.index')
            ->withInput()
            ->with('message', 'Successfully deleted Book.');
}
Once we delete one book it will redirect to our index page and show message "Successfully deleted book" similar case in update function.
11. Pagination
We can add pagination to our CRUD book page like depicted in next picture:Tuesday, March 11, 2014
Java Programming: Instalacion y Configuracion de Laravel 4 en window...
Java Programming: Instalacion y Configuracion de Laravel 4 en window...: INSTALACION Y CONFIGURACION DE LARAVEL 4 WINDOWS 7 1. Introduccion Todos, al comenzar un proyecto web personal o profesional; siempre no...
Instalacion y Configuracion de Laravel 4 en windows 7
INSTALACION Y CONFIGURACION DE LARAVEL 4 WINDOWS 7
1. Introduccion
Todos, al comenzar un proyecto web personal o profesional; siempre nos preguntamos cuál es la forma más rápida y eficiente de lograrlo, que framework debemos utilizar. De estas preguntas dependen, las ganancias del proyecto y el futuro mantenimiento del mismo. Y casi siempre a la hora de probar alguno de estos frameworks(Symfony, Ruby on Rails, Sinatra, Laravel, etc) no vemos con la frustración de ver que no funciona siquiera un ejemplo básico a la hora de instalar, esto debido a que debe hacerse algunas configuraciones manuales en los archivos de PHP y del servidor WAMPSERVER. En este tutorial se pretende mostrar la forma correcta de instalar el framework laravel en un servidor WAMPSERVER y Windows 7 como sistema operativo.2. Que es Laravel 4
Laravel es un framework de código libre para desarrollar aplicaciones web con PHP el cual últimamente viene creciendo en popularidad por la comunidad de desarrolladores en PHP. Su filosofía es desarrollar código PHP de forma elegante y simple, evitando el "código espagueti". Fue creado en 2011 y tiene una gran influencia de frameworks como Ruby on Rails, Sinatra, Symfony y ASP.NET MVC.3. Requisitos para el funcionamiento de laravel
- WAMP Server
Es un entorno para el desarrollo web utilizado en el sistema operativo windows; ya que funciona al igual como si cuando trabajamos en un servidor web, ya que podemos ejecutar estas aplicaciones web de manera local y ver como seria el funcionamiento antes de ser subidas a un hosting o servidor web. Además de ello podemos gestionar datos con la ayuda del motor de base de datos (MySQL) y su administrador (PHPMyAdmin). - Composer
Composer es un manejador de dependencias para PHP( por linea de comandos), este proyecto inspirado en npm y Bundler y sirve para administrar librerías de terceros o propias en nuestros proyectos de PHP a la hora de trabajar con laravel.
4. Instalar WAMP server
Descargar Wamp Server de la página oficialhttp://www.wampserver.com/en/
para la demostración de este tutorial se utilizo la versión 2.4, installar en el directorio por defecto "c:/wamp" Luego de haber instalado wampserver, abrir un navegador web comprobar que nuestro servidor wampserver se encuentra en funcionamiento, tal como se muestra en la figura siguiente:
5. Configuracion de Wamp Server
Antes de pasar a la instalacion de laravel, debemos configurar algunos archivos de PHP y de Apache en el servidor Wamp( Ojo si no se configura estos archivos no funcionara los siguientes pasos, ya que composer emitira un error al momento de instalacion tal como se indica a continuacion)Error when installing composer
"Some settings on your machine make Composer unable to work properly. Make sure that you fix the issues listed below and run this script again: The openssl extension is missing, which means that secure HTTPS transfers are impossible. If possible you should enable it or recompile php with --with-openssl".
- Dirigirse a C:\wamp\bin\php\php5.4.16 y editar el archivo php.ini, descomentar extension=php_openssl.dll
- Digirirse a C:\wamp\bin\apache\Apache2.4.4\bin y editar el archivo php.ini y descomentar extension=php_openssl.dll
6. Instalar Composer
Descargar Composer de su pagina oficial https://getcomposer.org/ y luego de descargar doble click para empezar su instalacion, luego hacer Click en Next.Si deseas administrar tus proyectos mediante el windows explorer puedes selecionar la opcion "Install Shell Menus" aunque lo recomendable es la administracion por la linea de comandos.
A continuacion nos pedira que selecionemos el archivo de ejecucion de PHP, para esto dirigirse a C:\wamp\bin\php\php5.4.16 y seleccionar php.exe, luego click en Next.
Luego nos pedira el navegador que utilizaremos por defecto, seleccionar el navegador de tu preferencia y luego click en Next y completar la instalacion.
Para comprobar que realmente tenemos instalado correctamente composer, abrir un terminal de windows y escribir composer y presionar enter, nos debera mostrar el logo de composer tal como se muestra en la figura siguiente:
7. Crear un proyecto laravel con composer
Existen dos formas de crear un proyecto con laravel, uno es descargando el archivo master de internet y la otra es mediante composer tal como lo haremos a continuacion.Para crear un proyecto web con laravel 4 abrimos un terminal de windows y dirigirse a C:/wamp/www: Crear un nuevo directorio el cual sera un proyecto de laravel para esto simplemente digitar mkdir laraveltest y presionar enter; luego acceder a dicho directorio y ahora crearemos el proyecto laravel escribiendo lo siguiente:
composer create-project laravel/laravel --prefer-dist
Luego de esto empezara a descargar las librerias necesarias para nuestro proyecto laravel. En la siguiente figura se muestra todo lo explicado en esta parte.
Si no hubo problemas de conexion con internet, nos mostrara la ventana siguiente donde nos indica que nuestro proyecto se creo correctamente.
8. Ejecucion del proyecto creado
Antes de ejecutar nuestro proyecto laraval creado anteriormente agreguemos algo al archivo hello.php el cual se encuentra ubicado en c:\wamp\www\laraveltest\laravel\app\views Abrir con cualquier editor de texto y agregar una etiqueta h1 con tu nombreAbrir un navegador web y escribir lo siguiente: http://localhost/laraveltest/laravel/public/
Subscribe to:
Comments (Atom)


